CanningHow To Guide for Home Water Bath Canning

How To Guide for Home Water Bath Canning

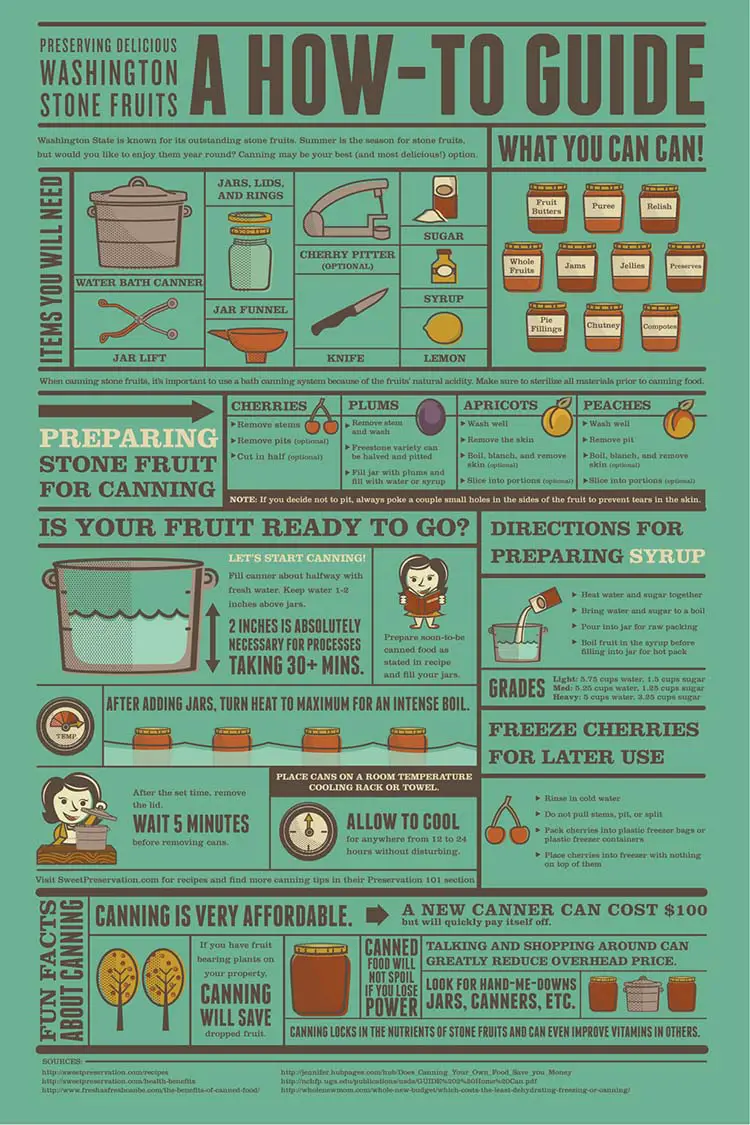
This step by step tutorial of How To Guide for Home Water Bath Canning will make preserving food a snap.
How To Guide for Home Water Bath Canning

Via: https://www.behance.net/

Make sure you like The Homestead Survival on Facebook, Shop AMAZON with Us and explore our  PINTEREST BOARDS  for innovative ways you can become self-sufficient on a budget.

Have you ever bought a new item only to find that the instructions seemed to be written by someone who had never even laid eyes on the product? That’s the way it seems to be with canners, so we decided to create some useful instructions to help you advance on your canning journey.

First, let’s mention a few things right off the bat.

• There are two main types of canner, the wet bath or the pressurized. Pressurized canners can can both acidic and low-acid foods, while wet bath canners are only good for canning acidic foods. In this article, we’ll be talking about wet bath canner.

• A wet bath canner is like a huge steel or aluminum pot that’s large enough to hold multiple jars at once, with sufficient height to cover the tops of the sealed jars by a couple inches of water.

• Maintenance is going to be the most important part of a successful canning season. Proper care of your canner includes making sure the cover and gauge don’t become wet, and testing the gauge with every new season to make sure it’s still in working order.

Now that that’s out of the way, let’s get on to the actual canning.

1. Start by sterilizing all your equipment.

2. Next, put the canner on your heated stove and fill it halfway with simmering (not boiling) water.

3. Fill the jars according to the instructions for that particular food.

4. Seal the jars securely but not overly tight.

5. Carefully set the jars in the bath using a jar gripper.

6. If you need more boiling water, add it now.

7. Boil for the length of time specified by your recipe, then turn off the heat and wait for five minutes.

8. Carefully remove the jars using the gripper and let them stand on the counter for an hour or so.

That’s all there is to it! Now you’re ready to store and enjoy them for the rest of the year.

Click here to read about:

http://pickyourown.org/water_bath_canning_directions.php

[amazon-related-products keywords=”canning supplies”]

Melissa Francis
Melissa Francis
Greetings! I'm Melissa Francis, the founder and primary contributor to The Homestead Survival. With over 20 years of experience in homesteading, sustainability, and emergency preparedness, I've dedicated my life to helping others achieve a simpler, more self-reliant lifestyle.

Subscribe Today

GET EXCLUSIVE FULL ACCESS TO PREMIUM CONTENT

Get unlimited access to our EXCLUSIVE Content and our archive of subscriber stories.

Exclusive content

Latest articles

Popular Articles

More articles