HolidaysHomemade Candy Canes

Homemade Candy Canes

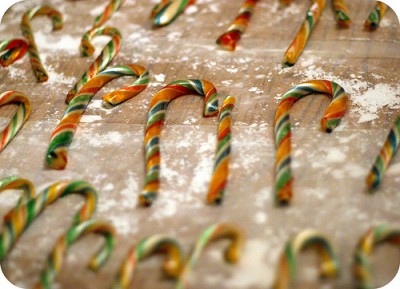
Get the kids and make homemade candy canes with them. What a neat way to involve the them with the preparations for Christmas.

Imagine how proud they will be when their own candy canes are hanging on the tree for everyone to see and enjoy. I have never made candy canes before but it looks like it would be interesting to do.

I know it would be neat to make them any flavor you want instead of only what you can buy. Banana flavored candy canes? Why not, I like banana.
whirlybirdblog.com
whirlybirdblog.com

Homemade Candy Cane Recipe

Cook time: 1 hour Total time: 1 hour
`

Ingredients
`

3 cups sugar

1 cup corn syrup

⅓ cup water

½ tsp. cream of tartar

⅛ tsp. kosher salt

Vegetable oil for pans, tools and gloves

2 tsp. peppermint oil (ideally not extract, but ok to use if that’s all you have)

1 tsp. vanilla extract

red food coloring – about ⅓ of one of those tiny bottles
`

Instructions:
~

Preheat the oven to 200 degrees. Oil two large baking sheets, a bench scraper, and kitchen shears or a sharp knife.

Lay a piece of parchment paper on the counter where the canes can dry. Move one of the baking sheets to the warm oven.

Meanwhile, in a straight-sided deep saucepan off heat, combine the sugar, corn syrup, water, cream of tartar, and salt and stir them together well.

Clip a candy thermometer to the side of the pot and move it onto medium-high heat.

Without stirring, let the syrup come up to 305 degrees. Using a pastry brush or a paint brush dedicated to culinary use, wash down any stray sugar crystals from the side of the pot. Ready the peppermint oil, food coloring, measuring spoons, and vegetable oil.

Glove thyself with either heat-retardant gloves or snug mittens covered with disposable gloves.

Once the syrup has reached temperature, pour it out onto the room temperature baking sheet. Drizzle the peppermint oil on top, and using the bench scraper, scrape the hot candy up from the bottom and fold it over onto itself to stir it through. Once it has cooled slightly, mix in the vanilla as well. Note that the peppermint scent in the air will be strong.

Continuously scrape up and stir the syrup to cool it until it becomes a pliable dough. Cut the dough in half and move one piece to the baking sheet inside the warm oven. (First, we’ll “pull” the white half of the candy cane. Then we’ll color the red half.)

Quickly oil your gloved hands, as it’s now time to pull the candy. Scrape up the candy dough into one piece and, working as quickly and as continuously as you can, pull it out into a rope, double it over onto itself, and twist it together. Pull it, double it, and twist it again. Keep on going this way at a quick clip, and you’ll notice that the candy will start to take on a ribbon-y sheen. This is how the candy will turn white, so keep going until the color is pure. Embrace the upper body workout. Note that anytime the candy becomes too stiff, simply warm it up again in the oven to soften.

Don’t let the candy get too hard. When it’s reached a nice white color, place it onto its baking sheet and move it to the warm oven. Re-oil your bench scraper. Take out the second tray of candy dough and pour on the red food coloring – about a third of one of those tiny bottles for a good rich color. Use your scraper fold the candy onto itself to incorporate the color completely. Note that this side of the candy cane does not need to be pulled. Move both candy cane trays to the oven and let them warm through for about 5 minutes until pliant.
Once warm and squishy enough to work with, take both pieces of candy from the oven and roll them into logs as long as the baking sheet. Cut each log into four equal pieces. Hang on to one red piece and one white piece, moving the rest of the candy back into the oven to keep warm.

On the counter-top, line the red and white logs alongside one another and begin to twist from one end, stretching as you go, making the candy canes as thin or as thick as you like. Use your oiled shears or knife to cut the length of each cane. Shape the hook of the cane, and press down on the ends to taper. Set the canes aside to cool. (Know, of course, that you could also cut into sticks, rounds, or individual peppermint sucking candy). Admire the individual quality of your handiwork.

Repeat this process with the remaining ¾ of the candy, one piece of each color at a time.
Allow candy to cool until completely hard; about 15 minutes. Wrap each cane in plastic wrap to keep it from sticking. Store in an airtight jar for several months.

Paige Raymond
Paige Raymond
Raised in rural Montana and educated in Mechanical Engineering and Sustainable Development, Paige Raymond combines a practical mindset with a passion for self-reliance and sustainability. With expertise ranging from mechanical solutions and food preservation to emergency preparedness and renewable energy, Paige is a proud author with more than 5000 published articles.

Subscribe Today

GET EXCLUSIVE FULL ACCESS TO PREMIUM CONTENT

Get unlimited access to our EXCLUSIVE Content and our archive of subscriber stories.

Exclusive content

Latest articles

Popular Articles

More articles