

This step by step tutorial of how to install raised bed garden watering irrigation system will help lighten your workload in the garden.
An irrigation system must have all of the following sections
1. Head Assembly
2. Supply Line Connection to the Beds
3. Drip Supply Lines
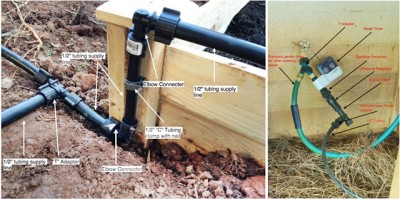
For the head, you’ll need a Y adapter, so you can attach standard garden hoses as well as the irrigation system to water the plants not in the beds; a water timer to set when the plants get waters, a back-flow preventer, to avoid contaminating the original water supply; a pressure regulator, so all sprayers maintain a constant flow of water; an in-line filter, which removes any dirt before it reaches your plants as well as keeping sprayers from getting clogged; a female hose thread adapter to connect the head assembly to the tubing; and 100 feet of ½” tubing. Everything gets attached in the order listed, in a linear fashion, so the pressure regulator would be connected on one side to the back-flow preventer and on the other to the in-line filter.
For the supply line connection, you’ll only need three things, a T adapter to allow the water to branch off in different directions, which lets you water all your beds; 2 elbow connectors, so the water can reach the beds, and a ½” C tubing clamp so the tubing will stay against the raised bed. Whenever a turn needs to be taken in the piping, the elbow connectors come in. So if you have the T adapter, you’ll connect a small amount of piping, then an elbow connector, and now the piping can easily make turns.
Lastly, the drip supply lines. This depends on the kind of plants you’re growing, how large the bed is, and how the plants are arranged and spaced. For this you’ll need a 32 GPH microsprinkler on a spike with an adjustable stream, these go directly into the tubing on the beds to deliver water to your garden. You can also use a figure 8 hose end to stop the water flowing out the end, but that’s optional.
Making an irrigation system like this can cost as little as $105, but whether the extra work is worth it depends on how you feel. It works well as a system, but can get frustrating if everything doesn’t fit together well. Some people prefer to just go out and buy one, but it’s all personal preference, which is important to remember.
Please LOOK BELOW to read the remaining part of the article.
Photo Source
Click here to read the source:
.