

This step by step tutorial of how to make an emergency preparedness survival paracord bracelet. We’ve all seen them, the bracelets with the helmet buckles that seem to have endless uses. So how about we make one?
First, this is made for an 8” wrist, so depending on the size of your wrist you may not be able to fit as much on it. This is also single color.
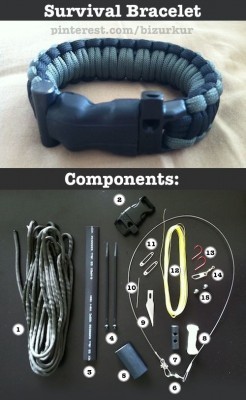
ITEMS NEEDED:
• 15′ 550 Paracord (Buy Here)
• Chlor-Floc Packet
• Curved Whistle Buckle
• Ranger Band
• 6” Heat Shrink Tubing
• 4” Cable Ties (x4)
• 18” Steel Fishing Leader
• 20” Jute Twine
• 18” Brass Wire
• X-Acto Knife Blade
• 1” FireSteel (Buy Here)
• Quick Tinder Fire Starter
• 2” Micro Saw Blade
• 20′ Braided Fishing Line
• Fishing Snap Swivel
• Fishing Hooks (x2)
• Slip Shot Sinkers (x2) (Buy Here)
• Safety Pins (x2)
• Needle
• Compass (opt) (Buy Here)
• Scissors
• Lighter
• Needle Nose Pliers
• Regular Pliers
• Electrical Tape
• Paracord Jig (opt)
Take the fishing line and needle and tape the needle to the fishing line. Put that, the fishing leader, and the wire into the heat shrink tubing using some string or extra fishing line. Put the hooks, sinkers, swivel, and pins on either end. Using the needle noses, grab near the end of the tube and heat it until it melts a little, then squeeze down to create a seal, then repeat on the other side. Now tape your blade, micro saw, and packet to the tube, the knife at the top and the packet at the bottom.
Set up your Paracord Jig with the length you want and your buckle in place, then loop your rope through the buckle. Loop the left from the bottom of the buckle upwards so it hangs over the buckle, then loop the right starting from the bottom and going upwards on the right side of the buckle, but when looping it on the left start form the top and loop it under, essentially creating ovals rather than simply crisscrossing. There should be three oval loops when done, one that goes through one of the FireSteel holes, one that goes under it, and one that goes through the other hole. Loop on the compass if you have one. Once that’s set up, begin weaving.
Once you have the first knot, turn the bracelet over and insert two cable ties under it, make sure the rest of the knots cover the ties. After three or four, slide the compass into place. Half way through, insert the other ties, ensuring they stick out at the end and knot until the buckle. Cut off the ends and melt it down with the lighter. Stick the ranger band on one end of the buckle, then stick the quick tinder underneath and you’re done!
Click here to read the source:
.
http://bizurkur.com/2015/diy-ultra-paracord-bracelet/