DIY ProjectsBuild Cordless Water Pump DIY Project

Build Cordless Water Pump DIY Project

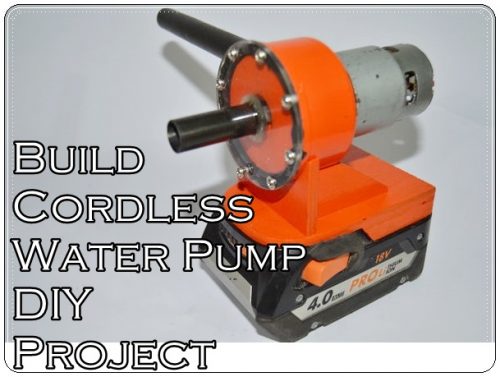
How to Build a Cordless Water Pump DIY Project is a great way to re purpose components into a useful homesteading tool.

Build Cordless Water Pump DIY Project

Here is a list of what is needed for this project: an 18-Volt DC motor, one battery-powered tool, one two-inch UPVC pipe with a cap, one 5mm pane of Plexiglass, one ½’ inch pipe, one 5mm pane of plywood, one wooden piece of 20mm x 5mm, a handful of screws, and a drum cap from an oil canister.

18v brushed DC motor (Chinese ones commonly used in cordless table fans)

A cordless tool battery (In my case its AEG 18V lipo battery you can use any other brand as well)

2 inch UPVC pipe

2 inch UPVC pipe end cap

5mm plexi glass sheet

1/2 inch pipe (In my case i have used an old carbon fibre pipe that i got from a broken golf stick )

5mm thick plywood sheet

wooden strip 20mm*5mm

A bunch of philips head screw

A drum cap from an old oil container

The motor should beplacedupon the UPVC cap with two screws and the UPVC cap should be glued to the foundation with plywood stability pieces. Make the outlet with a carbon fiber pipe that is placed for the water to come in easily from the pump. Build a translucent cap to give the pump a pretty look so we could see what is happening. In the front,use the Plexiglass to cut a hole in the middle and made for the pipes to come through. This façade is then screwed on the cover.

For the impeller, get the oil lid to open roundedcovers as the foundation. The blades are constructed fromthe UPVC pipe connected between the circled plates and the ends of the blade were made to fit in the front. Glue is placed to strengthen the entire foundation with this new blade. Mark the base’s shape and size on the dual-layered 6mm piece of plywood. Cut it into strips and sand them, and then place them on base’s side to build a gliding method. Build a stand at the base for two doors on the battery so it can be placedinside while securing the entire base and making surethe battery won’t fall out during when using it.

Next, paint the parts as it makes the wood waterproof; let it dry before finally constructing it as a whole. Place the motor on top, followed by the impeller over the motor shaft. The rubber pipe inside the impeller holds the motor shaft tightly, while the Plexi-glass is screwed to stop any leaks; silicon can be placed between the cap and housing. Finally, add a switch on the base and connect it with the motor and battery terminals.

Click here to read about how to Build a Cordless Water Pump DIY Project:

http://www.instructables.com/id/DIY-Cordless-Water-Pump/
.

Melissa Francis
Melissa Francis
Greetings! I'm Melissa Francis, the founder and primary contributor to The Homestead Survival. With over 20 years of experience in homesteading, sustainability, and emergency preparedness, I've dedicated my life to helping others achieve a simpler, more self-reliant lifestyle.

Subscribe Today

GET EXCLUSIVE FULL ACCESS TO PREMIUM CONTENT

Get unlimited access to our EXCLUSIVE Content and our archive of subscriber stories.

Exclusive content

Latest articles

Popular Articles

More articles