
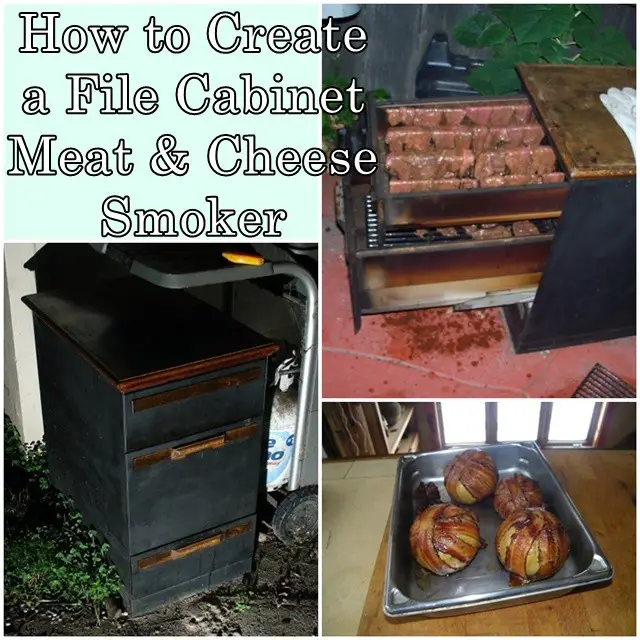
This how to create a file cabinet meat and cheese smoker diy project is a step by step tutorial that prove that using salvaged materials not only saves money but gives items a 2nd functional purpose. Thinking outside of the box should be considered a super power !
With a little DIY skill amost anyone can use the valuable information inside this project to make a great smoker.
Smoking meats has become a very popular way of preparing foods and this is especially true among homesteaders and some survivalists. One of the reasons is because slow cooking meat with low heat and smoke means fresh meats can be stored longer. While a commercially made smoker can easily be picked up from most hardware stores, building one’s own smoker provides an extra level of satisfaction.
This do it yourself project is a great example of ways that a person can repurpose an old, discarded file cabinet and turn it into an extremely useful backyard smoker. Most of the materials can be picked at a flea market or supply store.
Materials:
Metal filing cabinet. I got mine free from work as it was old and the cloth cushion top was torn. Mine is also an under-desk sized one, though this should work for the full-height ones as well (Tower of smokin meat!).
3/4″ Oak Veneered plywood 2’x2′ (Might need larger if your cabinet is longer/deeper. Mine was 2’x1′-5″)
~8′ of solid oak edge moulding. I used a fairly simple astragal pattern, 1.25″ (half-round top with a chamfered curve extending the bottom).
Grill grates. They make grill grates that can be extended to fit any grill. If you can’t find one to the exact size you need, get these instead.
Washers, grommets, screws, nuts. Various small bits of hardware
Finishing nails
Aircraft remover: Highly effective at removing everything down to bare metal. BE CAREFUL WITH IT, it will burn the #@$! out of you if you get so much as a drop on your skin, and removes/eats paints and plastics and just about anything not metal.
Grill/high-temp paint (Rustoleum flat black grill paint)
Shelf support pegs (metal)
Wood glue
Wood stain
Polyurethane
Tools:
Drill and bits
Tin snips
Hammer
Pliers
screw driver
Thick leather gloves (tin snips leave super sharp serrated edges!)
Rubber gloves (made of stuff Aircraft remover will not eat, ie: not nitrile. Thick yellow kitchen gloves seem to work, or heavy duty PVC ones)
paint scraper (I got away with a cheap plastic set, went through 3 of them though as aircraft remover slowly softened them up into mush)
Miter saw
Grommet punch/press (should come with any grommet kit)
hack saw or dremmel cuttoff wheel (bolt cutters will do too)
wood clamp
Vice (helpful, not necessary)
Benefits of reading and following the the Filing Cabinet Smoker DIY Project
● Great way to reuse, old surplus office furniture instead of it going to a landfill
● The project includes a complete list of all of the necessary materials, supplies and tools needed
● It also includes a complete, easy to read and follow 11 part, step by step instruction guide
● There are numerous full color photos that depict many of different stages of construction
Click here to read about how to create a file cabinet meat and cheese smoker diy project:
http://www.instructables.com/id/Filing-Cabinet-Smoker/?ALLSTEPS
[amazon-related-products keywords=”meat smoker”]