
This amazing process of installing ball valve on party Coleman Cooler turns this once thought of camping supply equipment into “Party Equipment”. It becomes an oversized insulated beverage container…. just add ice, juice and any adult alcohol beverage (jungle juice) of your choosing? A simple twist of the lever and ice cold liquid comes flowing out.
This do it yourself project can be completed in a single afternoon, yes it is that easy.
Having a nice cooler with a valve is very helpful when it comes to making homemade party drink mix in a large amount for an outdoor BBQ gathering. It can be made into a chiller as part of a homemade tap. This instruction is about building a tap with a ball valve, which is necessary to make the homemade cooler with beverages can be drained from the cooler controlled while it is simple to undo and clean.
To start, gather your supplies and tools together in a workshop area. Get a new Coleman cooler that will holds gallons of your favorite cold beverage. Then, begin by getting rid of the screws that hold the cooler’s lid. Remove the plug by unscrewing the outside nut and take out the stem and washer. Cut the plastic piece off from the plug and widen the inside of the hole by shaving off some threads with a knife.
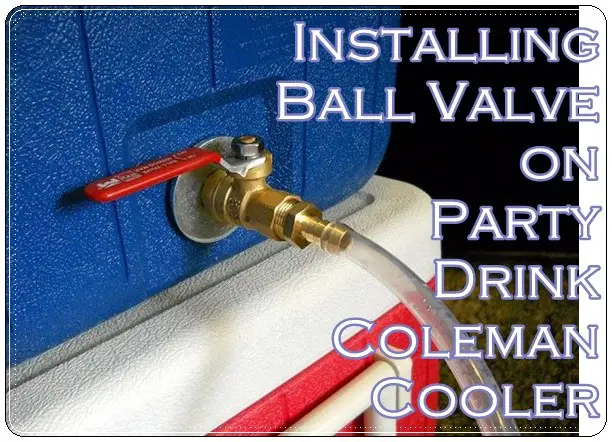
Afterwards, assemble the new ball valve placing the rubber washer back inside, as well as the nut, but get rid of the stem. Screw on the pipe’s nipple on the ball valve and place the washer over the outer nut. Stick the pipe nipple in through the washer and nut and place the 16mm washer over that. Then, strengthen the pipe coupling onto the ends of the pipe nipple to make it watertight. Finally, put the hose barb on the other end of the ball valve. Test it out; if it does leak, it’s good to use.
Here are the parts I used to make the new ball valve assembly:
– (1) 3/8″ brass ball valve
– (1) 3/8″ brass hose barb adapter
– (1) 3/8″ brass coupling
– (1) 3/8″ x 1-1/2″ brass pipe nipple
– (1) 16mm flat washer (it fits over the pipe nipple)
– (1) huge washer (this is not the technical term)
– 3/8″ clear tubing (I had this already)
– the modified outside nut on the cooler
Click here to read about the process of Installing Ball Valve on “Party Drink” Coleman Cooler:
http://www.instructables.com/id/Installing-a-ball-valve-on-a-Coleman-cooler/