
This No Smoke Fan Powered Wood Gasifier Stove tutorial has step by step detailed instructions.
Tools and parts needed
• Drill
• 1/8 or 9/64th titanium drill bit
• Dremel tool with fiberglass cutoff wheel
• 12-quart aluminum stock pot, restaurant grade with a thick lid
• 4-quart stainless steam table pot with inset top
• 6-quart stainless steam table pot bainmarie
(The above 3 pots must be from a restaurant supply store)
• 12 stainless screws
Step 1: Main lid cut
Cut a hole the exact size of the 6-quartpot in the 12-quart stock pot lid. This has to be perfect! The gap must be airtight.
Step 2: Fan hole cut
Mark out the opening for the fan on the side, and as near to the bottom as possible of the 12-quart pot. You can use a regular computer fan for air supply.
Step 3: Air cowling cut
Cut a large square or round hole in the center of the outer 6-quart stainless pot with Dremel. This will ensure that the air from the fan keeps the outer 12-quart pot temperatures down.

Step 4: Inner burn pot air holes
Mark the holes out with a permanent marker and get ready to start stainless drilling. Make sure the drill bit is taking to the metal, so start slowly.
Stagger the lower holes as it allows for a secondary burn. The top holes will swirl the burning gases.
Step 5: Assemble pots
Assemble to pots into each other and ensure they line up.
Step 6: Drill holes for screws
Make sure the screw heads overlap to hold the inner burn pot.
Step 7: Fan Wiring
Use high-grade 9-volt battery snap leads and wire the snap connector at the fan end.
Reverse wire the other 9-volt snap to a 12-volt cigarette lighter (backward).
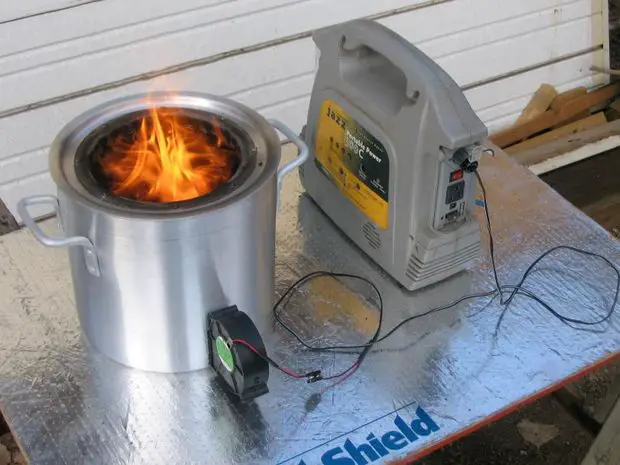
Step 8: Complete
Get a battery pack and fire up the stove. It is now complete!
Click here to read about:
http://www.instructables.com/id/Large-portable-wood-gasifier-Campfire-in-a-can/