HolidaysShaving Cream Dyed Easter Eggs Project

Shaving Cream Dyed Easter Eggs Project

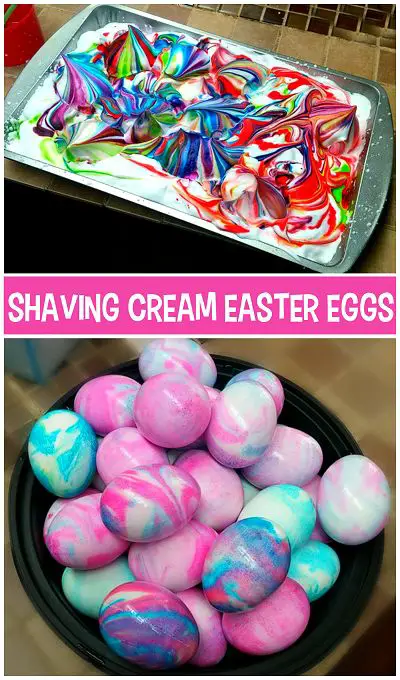
This shaving cream dyed Easter eggs project is amazingly simple to do that creates a colorful collection of marbled swirls. All the ingredients for this simple method most likely can be found in your kitchen and bathroom. If not, a quick inexpensive trip to the grocery store and you will have all the supplies you need.

Shaving Cream Dyed Easter Eggs Project

Make sure you like Homestead Survival on Facebook, Pinterest Boards or Google Plus to be updated every time we find a tutorial for innovative ways you can become self-sufficient on a budget.

Decorating eggs is an activity that kids of all ages have been enjoying for many generations. Over the years egg decorating has changed as people have discovered new ways to apply the color to the outside shell of the hard boiled egg. The old traditional way used to be mom would hard boil a bowl full of eggs and prepare multiple bowls with vinegar and food coloring. Each egg would be dipped into different colors. As the years have gone by, different methods were developed in order to produce more interesting colors.

Today, there are more different types of ways to decorate eggs for Easter. One of those ways is shown in this unique egg dying activity. The article describes in detail everything you will need to have on hand in order to prepare for the activity. You and your child will have a blast dipping each of the eggs into the multi colored shaving cream.

Benefits of using the Shaving Cream Dyed Easter Egg Activity

● Use it to introduce your children to decorating egg for Easter

● Article includes includes a list of all of the necessary materials and supplies

● Includes a complete, easy to read and follow step by step instruction guide

● Includes several full color photos which depict several of the steps

Materials Needed:

Neon Food coloring or regular food coloring

Hard Boiled Eggs (cooled)

Metal Casserole Dish

Shaving cream or cool whip

Straw

Latex Gloves

Directions:

1. Spread white shaving cream out into a metal casserole dish three to four inches deep.

2 Dribble food coloring across the surface. Neon food coloring makes the brightest colored Easter eggs.

3. Use a straw to swirl the colors around in the shaving cream.

4. Take your dried completely cooled hard boiled eggs and roll them around in the shaving cream with color dye swirls for thirty seconds. Use a latex gloved hand hand to remove them from shaving cream.

5. Sit colored eggs to the side on a paper plate and allow them to dry for five minutes.

6. After allowing the eggs to sit, wipe off shaving cream and rinse with water!

Your great bunch of homesteading kids will have a great time with the shaving cream and dye to make beautiful bright Easter eggs.

Picture credit (Instagram)

Click here to read about how to make shaving cream dyed Easter eggs project:

http://www.craftymorning.com/shaving-cream-dyed-easter-eggs/

Melissa Francis
Melissa Francis
Greetings! I'm Melissa Francis, the founder and primary contributor to The Homestead Survival. With over 20 years of experience in homesteading, sustainability, and emergency preparedness, I've dedicated my life to helping others achieve a simpler, more self-reliant lifestyle.

Subscribe Today

GET EXCLUSIVE FULL ACCESS TO PREMIUM CONTENT

Get unlimited access to our EXCLUSIVE Content and our archive of subscriber stories.

Exclusive content

Latest articles

Popular Articles

More articles