
")
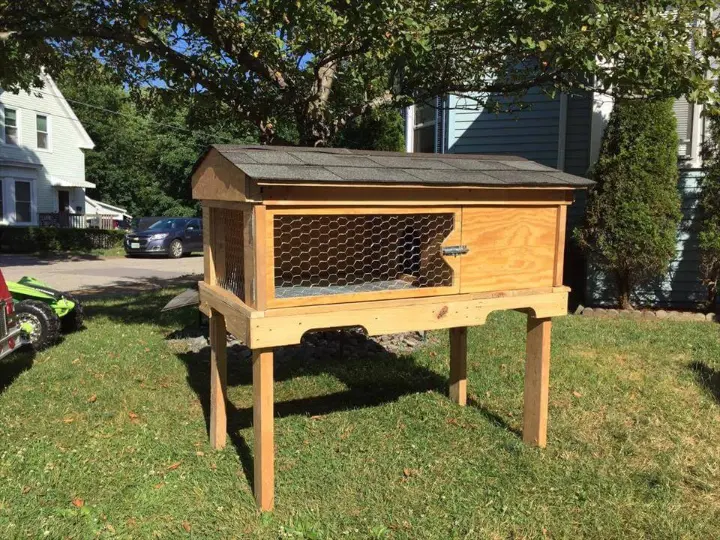
Ever wondered how you can provide a comfortable and safe space for your furry friends? With our step-by-step guide, you’ll learn how to construct your very own rabbit hutch. Whether you’re a beginner or an experienced DIY enthusiast, this project is perfect for anyone who loves animals and wants to create a custom home for their rabbits.
Imagine the satisfaction of seeing your rabbits hop around in a hutch that you built with your own hands. No more worrying about cramped spaces or inadequate shelter. Our easy-to-follow instructions, complete with diagrams and templates, will guide you every step of the way. From designing the layout to ensuring proper ventilation and food storage, we’ve got you covered.
Understanding Rabbit Hutch Basics
Important Features for a Healthy Hutch
There are several important features you need to consider to ensure the health and well-being of your furry friends. One crucial aspect is ventilation. Proper airflow is essential to prevent the buildup of ammonia from urine and feces, which can be harmful to rabbits’ respiratory systems. Incorporating vents or mesh panels into the design will help maintain good air circulation.
Insulation is another key consideration, especially if you live in an area with extreme temperatures. Insulating the hutch will provide protection against both cold and hot weather conditions, keeping your rabbits comfortable throughout the year. You can use materials such as foam insulation or double-walled construction to create a thermally efficient environment.
The flooring of the rabbit hutch also plays a vital role in their overall health. Wire mesh floors are commonly used as they allow droppings to fall through, preventing rabbits from sitting in their waste. However, wire mesh alone can be uncomfortable for their feet. To address this, providing a solid surface within the hutch where they can rest is beneficial.
Space and security are essential factors in designing a healthy rabbit hutch. Rabbits need enough room to move around freely and engage in natural behaviors like hopping and stretching. The general rule of thumb is that each rabbit should have at least four times its length in living space within the hutch. Incorporating secure doors and latches will protect your rabbits from predators while allowing easy access for cleaning and maintenance.
Waste management systems are crucial for maintaining cleanliness within the hutch. Consider including removable trays or slatted floors that allow droppings to fall into a collection area below. This makes it easier to clean up waste regularly without disturbing your rabbits too much.
Selecting the Right Location
Choosing the perfect location for your rabbit hutch is essential for their comfort and safety. Start by considering the amount of sunlight exposure the area receives. While rabbits need some natural light, excessive direct sunlight can cause overheating. Opt for a spot that offers a balance of shade and sunlight throughout the day.
Temperature is another crucial factor to consider. Rabbits are sensitive to extreme heat or cold, so it’s important to select a location that provides adequate insulation against temperature fluctuations. Placing the hutch in an area protected from strong winds will also help maintain a stable environment.
Predator protection is paramount when choosing a location for your rabbit hutch. Avoid areas where predators like foxes or raccoons may have easy access. If necessary, install additional fencing or barriers around the hutch to keep unwanted visitors at bay.
Creating a peaceful and quiet environment is essential for your rabbits’ well-being. Avoid placing the hutch near noisy areas such as highways or busy streets, as loud noises can stress them out. Instead, choose a tranquil spot away from high traffic zones where they can feel safe and secure.
Lastly, ensure there is enough space around the hutch for easy access and maintenance. You’ll need room to clean the hutch, refill food and water containers, and provide fresh bedding regularly. Having ample space around the hutch will make these tasks much more convenient.
Materials and Tools Overview
Now let’s talk about the materials and tools you’ll need to construct a sturdy and durable rabbit hutch. Opt for untreated lumber like cedar or pine as they are safe for rabbits and resistant to weather conditions. Avoid using pressure-treated wood as it contains chemicals that could be harmful if ingested by your pets.
For wire mesh, choose options with small gaps (around 1 inch) to prevent rabbits from getting their heads stuck between wires. Galvanized wire mesh is recommended as it resists rusting over time.
Screws should be used instead of nails for better stability. Make sure to select screws that are appropriate for outdoor use and won’t easily corrode or rust.
As for the tools, you’ll need a saw to cut the wood to size, a drill to make holes and secure the pieces together, and a measuring tape to ensure accurate dimensions. Having these basic tools on hand will make the construction process much smoother.
Planning Your Rabbit Hutch Design
Careful planning is essential to create a comfortable and functional living space for your furry friends. Whether you have limited space or want to customize the design according to your preferences, there are various options available to suit your needs.
Free DIY Plans for Small Hutches
If you’re looking for free downloadable plans for small rabbit hutches, you’re in luck! There are numerous resources available online that offer detailed instructions and diagrams. These plans cater to different space requirements and allow you to build a compact yet functional hutch for your rabbits.
By accessing these plans, you can choose from a variety of designs and easily customize them according to your preferences and the materials you have available. Whether you prefer a single-level or multi-level hutch, with or without outdoor access, there’s sure to be a plan that suits your needs.
Following these detailed instructions will ensure a successful construction process. From framing the structure to adding doors and wire mesh, every step is carefully explained. By following these plans, even beginners can confidently build their own rabbit hutches.
For example, one popular plan provides measurements and materials lists for constructing a simple yet effective rabbit hutch using plywood and wire mesh. The plan includes step-by-step instructions on assembling the frame, attaching the walls and roof, as well as adding finishing touches such as hinges and latches. With these plans at your disposal, building a small rabbit hutch has never been easier!
A-Frame Hutch Construction Guide
Another popular design option is an A-frame style rabbit hutch. This unique design not only provides ample space but also adds visual appeal to your backyard or garden area. Constructing an A-frame hutch may seem daunting at first glance but fear not, as we have a step-by-step guide to help you through the process.
The construction of an A-frame hutch begins with building the basic structure. By following detailed instructions, you can easily frame the hutch using sturdy materials such as wood or PVC pipes. The guide will walk you through adding supports for stability and roofing the hutch to protect your rabbits from the elements.
One advantage of an A-frame design is its stability. The angled roof allows rainwater to run off easily, preventing any water damage inside the hutch. The raised structure provides better ventilation for your rabbits, ensuring their comfort and well-being.
By carefully following this construction guide, you’ll be able to create a unique and visually appealing home for your rabbits that is both stable and secure.
Sectional Hutch Step-by-Step Instructions
For those who prefer a modular approach, constructing a sectional rabbit hutch is an excellent choice. This design allows you to build each section separately before assembling them together, providing flexibility in terms of size and layout.
To begin building a sectional hutch, it’s important to follow step-by-step instructions on constructing each section. These instructions typically include details on framing, attaching wire mesh, and adding doors or access points. By following these instructions closely, you can ensure that each section of the hutch is sturdy and functional.
Once all sections are complete, it’s time to assemble them together. This process may involve connecting sections using hinges or brackets and securing them in place with screws or nails. The modular nature of this design makes it easy to expand or modify your rabbit hutch as needed.
Whether you choose a single-level or multi-level sectional hutch design, customization options are endless. You can add ramps or platforms for extra space and entertainment for your rabbits or incorporate nesting boxes for their comfort.
Constructing the Hutch Frame
Now that you have planned your rabbit hutch design, it’s time to start building! The first step in constructing a DIY rabbit hutch is framing the basic structure. This section will guide you through the process of creating a sturdy foundation for your hutch.
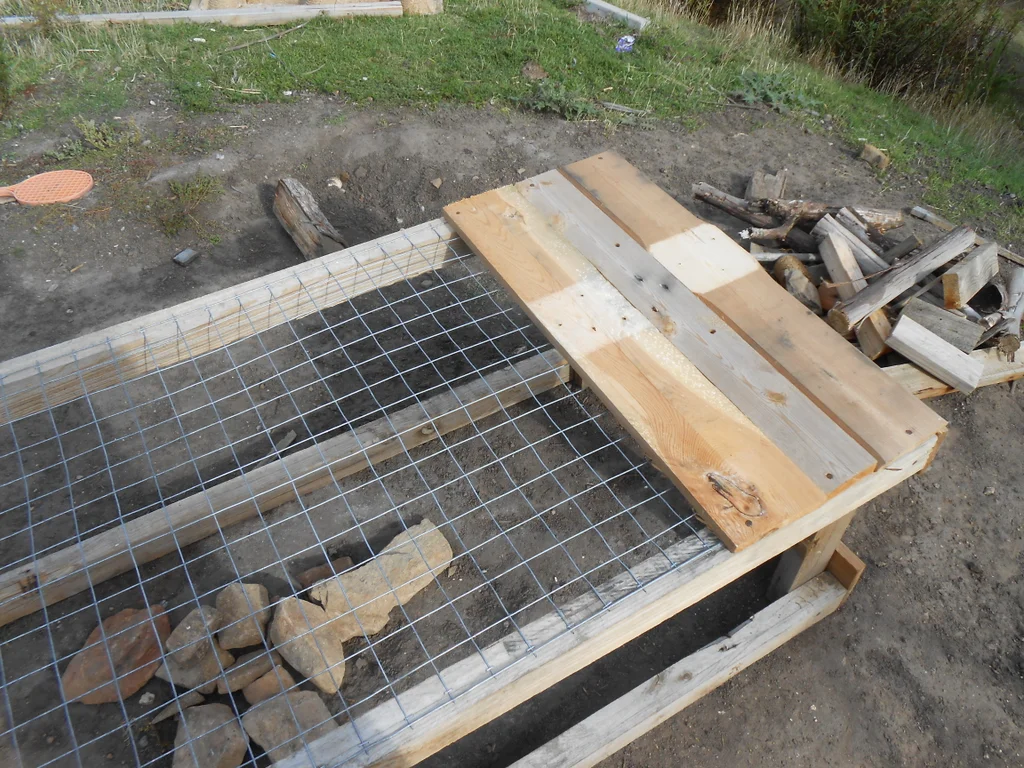
Framing the Basic Structure
Proper framing is crucial when building a rabbit hutch as it provides stability and support for the entire structure. Before you begin, it’s essential to understand different framing techniques and materials available.
Wood is commonly used for framing rabbit hutches due to its durability and ease of use. You can choose from various types of wood, such as pine or cedar, depending on your preference and budget. Remember to select untreated wood to ensure the safety of your rabbits.
To create a solid foundation, follow these step-by-step instructions:
-
Start by measuring and cutting the pieces of wood according to your desired dimensions. Accuracy in measurements is key to achieving precise results.
-
Use screws or nails to join the pieces together securely. Reinforce with corner brackets for added strength.
-
Ensure that the frame is sturdy enough to support the weight of the hutch and withstand any external forces.
-
Consider adding cross braces or diagonal supports for additional stability if needed.
By following these steps, you can construct a robust framework that will serve as the backbone of your rabbit hutch.
Constructing Front and Back Sections
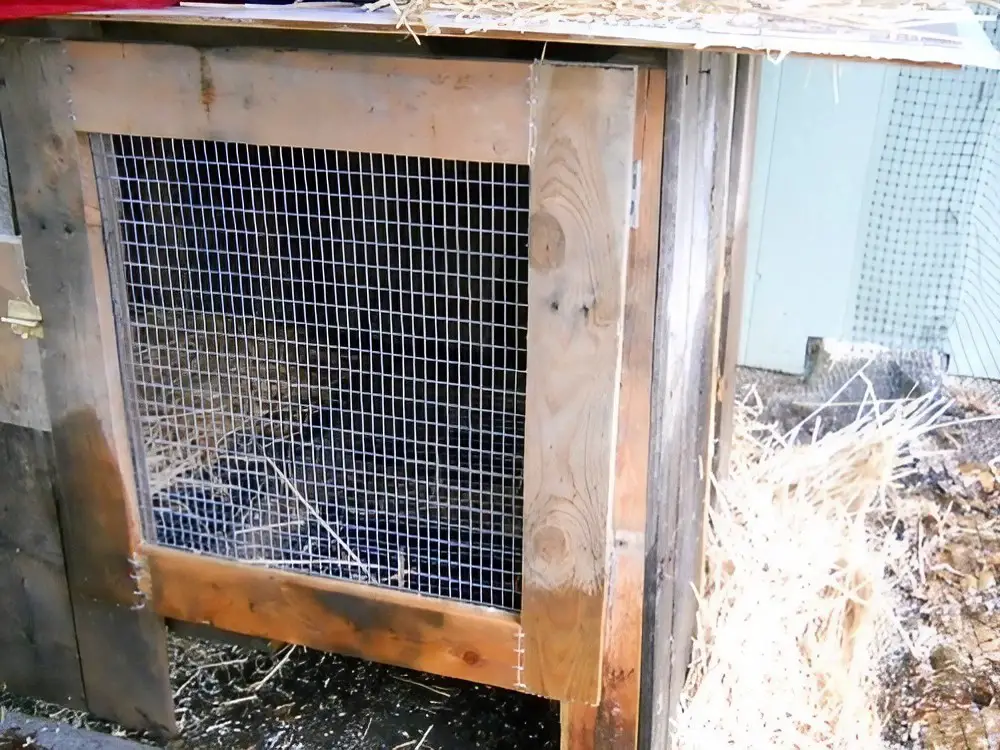
The front and back sections of your rabbit hutch are vital components that provide ventilation, security, and access for both you and your furry friends. Here’s how you can construct these sections effectively:
-
Cut pieces of wood according to the dimensions required for each section.
-
Attach wire mesh securely to allow proper airflow while preventing predators from entering.
-
Create doors using hinges or latches for easy access during cleaning or feeding times.
-
Customize the design by adding windows or other features that suit your preferences and the needs of your rabbits.
-
Ensure that the front and back panels are functional and aesthetically pleasing, providing a safe and comfortable environment for your furry companions.
Remember to prioritize ventilation to maintain good air circulation within the hutch while ensuring adequate security measures to protect your rabbits from potential predators.
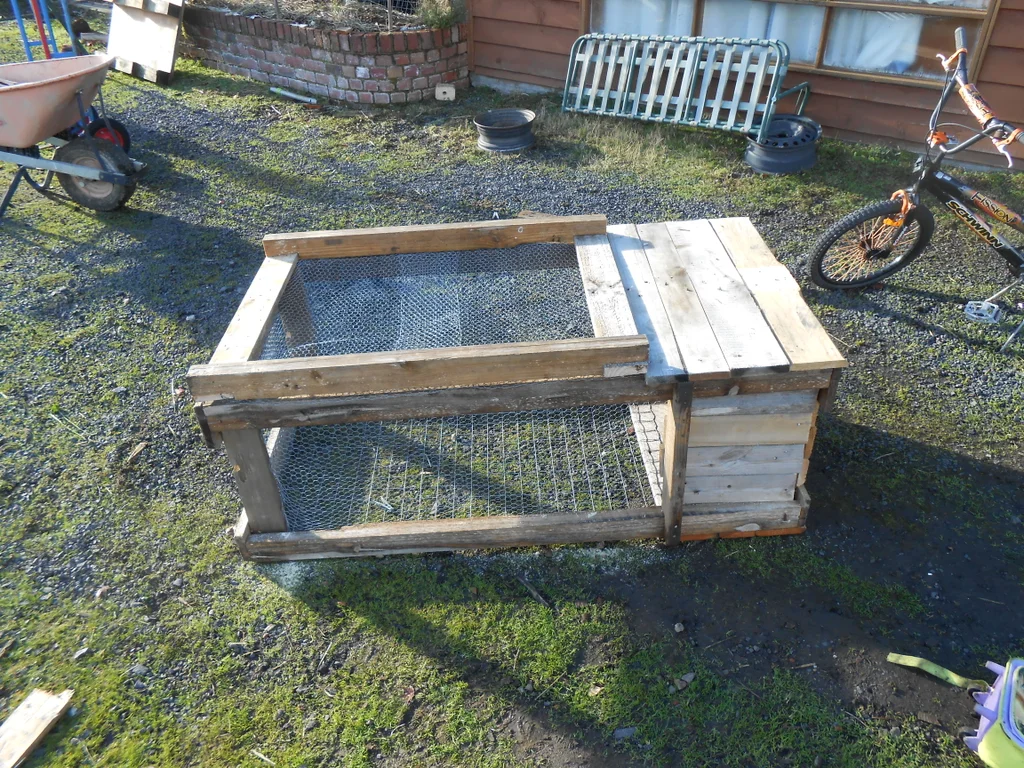
Assembling Hutch Legs
The legs of your rabbit hutch are essential for elevating the structure off the ground, providing stability and protection against dampness. Follow these steps to assemble sturdy legs for your hutch:
-
Choose appropriate leg dimensions and materials that can support the weight of the hutch.
-
Attach the legs securely to the main structure using screws or brackets.
-
Consider adjustable legs if you anticipate placing your hutch on uneven surfaces or if you may need to make future adjustments.
-
Ensure that the legs are evenly spaced and level to prevent any wobbling or instability.
By constructing well-built legs, you create a solid foundation for your rabbit hutch, ensuring its longevity and structural integrity.
Enhancing Structural Stability
Adding Middle and Roof Supports
One crucial aspect to consider is enhancing its structural stability. By adding middle and roof supports, you can ensure that your hutch is strong and durable, providing a safe and secure environment for your rabbits.
To begin, follow detailed instructions on cutting and attaching support beams. These beams will help distribute the weight evenly throughout the hutch, preventing any sagging or potential collapse. By strategically placing these supports, you can create a sturdy framework that can withstand various weather conditions.
Consider different support configurations based on your hutch design. Depending on the size of your hutch and the materials used, you may need additional supports in specific areas to reinforce weak points. For example, if you have a larger hutch with multiple levels, adding vertical middle supports will provide extra stability and prevent any wobbling or swaying.
By ensuring proper weight distribution and structural integrity through middle and roof supports, you can significantly enhance the overall stability of your rabbit hutch. This is especially important if you live in an area prone to strong winds or heavy snowfall.
Stabilizing and Standing the Hutch
Once you have constructed the frame of your rabbit hutch with added middle and roof supports, it’s essential to stabilize it properly to prevent tipping or shifting. Follow these techniques to ensure that your hutch stands securely:
-
Leveling: Begin by checking if the ground where you plan to place the hutch is level. Uneven ground can lead to instability issues. Use a level tool to make adjustments as needed.
-
Securing: To secure the structure further, use stakes or anchors driven into the ground at each corner of the hutch. This will provide additional support against forces such as wind gusts or curious animals trying to move or knock over the enclosure.
-
Bracing: Consider adding diagonal braces to the corners of the hutch for added stability. These braces can be made from sturdy materials such as metal or wood and will help prevent any swaying or shifting.
By following these steps, you can create a robust and stable environment for your rabbits. This is crucial for their safety and well-being, as a shaky or unstable hutch can cause stress and potential injuries.
Roofing and Exterior Finishing
Roofing Options for the Hutch
There are several materials you can consider. Each option has its own benefits and considerations, so let’s explore them:
-
Shingles: Shingles are a popular choice for hutch roofs due to their durability and weather resistance. They come in various materials such as asphalt or cedar, providing excellent protection against rain and snow. Installing shingles involves overlapping each row and nailing them down securely with a pneumatic nailer.
-
Corrugated Metal: Another viable option is corrugated metal roofing. This material is known for its strength and longevity, making it ideal for outdoor structures like rabbit hutches. It offers superior resistance to harsh weather conditions while ensuring proper drainage. When installing corrugated metal, be sure to use appropriate screws or nails that won’t rust over time.
-
Waterproof Fabric: For those looking for a lightweight and easy-to-install roofing option, waterproof fabric can be an excellent choice. This material is typically made from durable polyester or nylon that has been treated with waterproof coatings to provide protection against the elements. You can secure the fabric tightly over the hutch frame using staples or clips.
Regardless of the roofing material you choose, it is crucial to ensure proper drainage on your rabbit hutch roof. Standing water can lead to rotting wood or leaks inside the hutch. Consider adding a slight slope to your roof design or incorporating gutters and downspouts to direct water away from the structure.
In addition to functionality, you also want your rabbit hutch to look visually appealing in your outdoor space. That’s where painting or staining comes into play.
Painting or Staining for Appearance
Painting or staining your DIY rabbit hutch not only enhances its appearance but also provides protection against weathering and extends its lifespan. Here are some key considerations for this aspect:
-
Suitable Paint or Stain: When selecting paint or stain for your hutch, it is essential to choose products that are safe for rabbits. Look for non-toxic options specifically formulated for outdoor use and suitable for application on wood surfaces. These products should be free from harmful chemicals that could potentially harm your furry friends.
-
Surface Preparation: Before applying paint or stain, proper surface preparation is crucial to ensure optimal adhesion and longevity of the finish. Start by sanding the wood to create a smooth surface, removing any rough edges or splinters. Then, clean the hutch thoroughly to remove dust, dirt, and any previous coatings. Once the surface is clean and dry, you can proceed with applying the paint or stain.
-
Color Choices: Consider choosing colors that complement your outdoor space or reflect your personal style. Lighter shades can help reflect heat during hot summer months, while darker tones may provide a more rustic look. Using contrasting colors for different parts of the hutch can add visual interest and make it stand out in your backyard.
By painting or staining your rabbit hutch, you not only protect it from weathering but also add a personal touch to its overall aesthetic appeal. Just remember to follow the manufacturer’s instructions when applying paint or stain and allow sufficient drying time before introducing your rabbits to their new home.
Interior Features and Comfort
Proper Ventilation Techniques
Proper ventilation is crucial. Understanding the importance of adequate airflow without compromising insulation is key. By incorporating vents or mesh openings in strategic locations, you can ensure fresh air circulation while maintaining a cozy sleeping area for your rabbits.
Respiratory issues are common among rabbits, especially if they are housed in poorly ventilated spaces. To prevent this, it’s important to provide sufficient ventilation within the hutch. This can be achieved by installing vents or mesh panels on opposite sides of the hutch to allow for cross-ventilation. These openings will facilitate the exchange of stale air with fresh air, promoting better respiratory health for your furry friends.
When creating ventilation openings, consider their size and placement carefully. The goal is to strike a balance between allowing enough airflow and preventing drafts that could make the interior too cold during colder months. Placing vents higher up on the hutch will help avoid direct drafts near ground level where rabbits usually rest.
Incorporating Slanted Waste Panels
Another important aspect of designing a rabbit hutch is incorporating slanted waste panels. These panels serve two purposes: directing droppings away from the rabbits’ living space and facilitating easy cleaning and maintenance.
By constructing slanted panels at the bottom of each cage or section within the hutch, you can ensure that any waste produced by the rabbits falls away from their sleeping area. This not only keeps their living space cleaner but also prevents them from coming into contact with their own waste, reducing the risk of infections.
To create slanted waste panels, start by measuring and cutting pieces of durable material such as plastic or metal that fit snugly against the bottom edges of each cage or section. Attach these panels at an angle so that droppings slide down towards a designated collection point outside the hutch.
Regular cleaning is essential to maintain a hygienic and odor-free living space for your rabbits. With slanted waste panels, the cleaning process becomes much easier. Simply remove the waste collection point, dispose of the droppings, and replace it with a clean container or tray.
Inserting and Securing Cages
Properly inserting and securing cages within the hutch is crucial. This ensures that each rabbit has enough space while also preventing any accidents or injuries.
Before inserting cages into the hutch, consider their size in relation to the available space. Each rabbit should have enough room to move around comfortably without feeling cramped. Choose cages made from sturdy materials that can withstand chewing and scratching.
There are various methods for attaching cages to the hutch structure. Some options include using zip ties, wire clips, or hooks. Whichever method you choose, make sure that it securely fastens the cage in place while still allowing for easy removal when needed.
Spacing between cages is also important to consider. Leave enough room between each cage to prevent rabbits from reaching through and potentially harming one another. This will ensure their safety while promoting a peaceful coexistence within the hutch.
By following these guidelines on proper ventilation techniques, incorporating slanted waste panels, and inserting and securing cages within your rabbit hutch, you can create an interior that prioritizes comfort and well-being for your furry friends.
Optional Features for Your Hutch
Installing LED Lights
If you want to take your DIY rabbit hutch to the next level, consider installing LED lights. Not only do they add a touch of sophistication to your hutch, but they also offer several benefits for both you and your furry friends.
LED lights are known for their energy efficiency, making them an excellent choice for outdoor use. These lights consume less electricity compared to traditional bulbs, which means you can keep them on longer without worrying about excessive energy consumption or high electricity bills.
It’s essential to follow proper instructions. You want to ensure that the wiring is secure and safe for your rabbits. By illuminating the hutch with LED lights, you provide proper visibility during nighttime or winter months when natural light may be limited. This added illumination not only helps you easily check on your rabbits but also creates a well-lit environment that promotes their activity and overall well-being.
Adding Windows and Doors
Windows and doors are crucial features in any rabbit hutch as they serve multiple purposes. Incorporating windows allows natural light into the hutch, creating a more inviting space for your rabbits. It also provides ventilation, ensuring fresh air circulates within the enclosure.
When constructing windows for your rabbit hutch, keep in mind that safety should be a top priority. Opt for sturdy materials such as plexiglass or wire mesh that can withstand chewing or scratching from curious bunnies. Consider adding removable panels or covers to regulate airflow during extreme weather conditions.
Secure doors are another essential feature of a well-designed rabbit hutch. They provide easy access for cleaning purposes and allow you to interact with your rabbits comfortably. Constructing doors with latches ensures that they remain closed securely while preventing any potential escape attempts by agile rabbits.
To enhance functionality further, think about incorporating additional features like ramps or sliding doors. Ramps can provide easy access to different levels within the hutch, allowing your rabbits to explore and exercise. Sliding doors, on the other hand, offer a convenient way to open and close sections of the hutch without taking up extra space.
By adding windows and doors to your rabbit hutch, you create a functional and inviting entryway for your furry friends. These features not only enhance their living environment but also make it easier for you to care for them.
Incorporating optional features like LED lights, windows, and doors into your DIY rabbit hutch can elevate its functionality and aesthetics. Providing proper lighting with LED lights ensures visibility during darker hours while promoting an active lifestyle for your rabbits. Windows allow natural light and ventilation into the enclosure, creating a more comfortable living space. Secure doors offer easy access for cleaning purposes and interaction with your furry friends. Consider these optional features when building or upgrading your rabbit hutch to provide a safe, comfortable, and enjoyable environment for your rabbits.
Final Touches and Maintenance
Installation and Finishing Techniques
Installation and finishing techniques are crucial for creating a sturdy and visually appealing structure. By following step-by-step instructions, you can ensure that all the components of your hutch are securely attached together.
Start by familiarizing yourself with the different installation techniques required for each element of the hutch. Whether it’s attaching wire mesh, hinges, or doors, understanding the proper methods will help you build a durable and functional hutch. Take the time to align each part correctly before fastening them together to avoid any misalignment issues later on.
Once all the components are in place, it’s time to focus on giving your rabbit hutch a polished finish. Sanding is an essential step in preparing the wood surfaces for painting or staining. It helps smooth out any rough edges or imperfections, ensuring a professional-looking end result.
After sanding, consider applying a sealant or varnish to protect the wood from moisture and prolong its lifespan. This extra layer will also enhance the overall appearance of your hutch by giving it a glossy finish. Choose products that are safe for animals and follow manufacturer instructions for application.
Remember that maintenance plays an important role in preserving your rabbit hutch over time. Regularly inspect all parts of the hutch to ensure they remain securely fastened and intact. Check for signs of wear or damage caused by weather conditions or chewing rabbits.
Prepping Supplies Before Construction
Before diving into construction, taking some time to prep your supplies can make the process smoother and more efficient. Start by measuring and cutting all materials according to your design plan. Accurate measurements ensure that everything fits together properly during assembly.
Organize your materials based on their sizes and types so that they’re easily accessible when needed. This reduces confusion during construction and saves you valuable time searching for specific pieces.
In addition to prepping the materials, it’s equally important to prepare your tools. Ensure that they are clean, sharp, and in good working condition. Dull blades or rusty nails can make construction more challenging and compromise the quality of your hutch.
Safety should always be a priority when working on any DIY project. Wear appropriate protective gear such as gloves, safety glasses, and closed-toe shoes to prevent injuries. Set up a dedicated workspace with enough room for maneuvering and storing your supplies.
By prepping your supplies and tools beforehand, you can streamline the construction process and minimize potential setbacks. This allows you to focus on building a sturdy and well-crafted rabbit hutch without unnecessary interruptions.
Community Engagement and Support
Gallery of Rabbit Hutch Designs
If you’re looking for inspiration for your DIY rabbit hutch, exploring a gallery of different designs is a great place to start. In this gallery, you’ll find a wide variety of styles, sizes, and configurations to suit your needs. From simple and functional hutches to more elaborate and decorative designs, there’s something for every aesthetic preference.
By browsing through the gallery, you can get ideas for customization or unique features that you may want to incorporate into your own hutch. Perhaps you’ll be inspired by a clever storage solution or an innovative design that maximizes space efficiency. Real-life examples of beautifully constructed rabbit hutches can provide valuable insights into what works well in terms of both form and function.
When choosing a design from the gallery, it’s important to consider not only your aesthetic preferences but also the specific requirements of your rabbits. Take note of factors such as ventilation, accessibility for cleaning, and security features to ensure the safety and comfort of your furry friends.
Rabbit Show Participation Guide
Participating in rabbit shows with your hutch-bred rabbits can be an exciting opportunity to showcase their breed qualities and skills. Not only does it allow you to engage with the community of fellow enthusiasts but it also provides valuable feedback on breeding progress.
To get started with rabbit show participation, it’s essential to familiarize yourself with the guidelines provided by show organizers. These guidelines will help you select appropriate show categories and classes based on the breed characteristics of your rabbits.
Preparing your rabbits for showmanship involves grooming them according to specific requirements. This includes trimming nails, cleaning ears, brushing fur, and ensuring they are in optimal health condition. Grooming plays a crucial role in presenting your rabbits at their best during competitions.
Rabbit shows offer various opportunities for recognition beyond breed competitions alone. There are often additional categories such as agility courses or costume contests where rabbits can showcase their unique talents and personalities. Participating in these events allows you to celebrate the individuality of your rabbits and have fun with them in a competitive setting.
Community Q&A Section
Building a rabbit hutch may come with its fair share of questions and challenges. That’s where the community Q&A section comes in handy. By accessing this valuable resource, you can find answers to commonly asked questions from experienced builders and fellow enthusiasts.
The community Q&A section provides an opportunity to learn from others’ experiences and gain insights into specific aspects of hutch building not covered in the article. Whether you’re looking for advice on materials, construction techniques, or troubleshooting common issues, chances are someone in the community has encountered a similar situation.
Engaging with the community by sharing your own questions or experiences is also encouraged. By actively participating in discussions, you contribute to the collective knowledge base and help create a supportive environment for beginners and seasoned builders alike.
Remember that building a rabbit hutch is not just about creating a shelter for your furry friends but also about fostering connections within the rabbit-owning community. The shared passion for these adorable creatures brings people together, allowing for collaboration, learning, and mutual support.
Additional Considerations for Rabbit Hutches
Tips for Successful Construction and Maintenance
There are several valuable tips that can help ensure its success. Experienced builders recommend following best practices, shortcuts, and time-saving techniques to create a well-built hutch that requires minimal upkeep over time.
One important consideration is the durability of the materials used. Opting for sturdy and weather-resistant materials such as pressure-treated wood or PVC can help extend the lifespan of your hutch. Applying a protective sealant or paint can further enhance its resistance to the elements.
Regular cleaning is essential for maintaining a healthy environment for your rabbits. It’s important to establish a cleaning routine that includes removing waste, replacing bedding, and sanitizing the hutch regularly. This not only keeps your rabbits comfortable but also helps prevent the buildup of bacteria or parasites.
In terms of maintenance, it’s crucial to address any repairs or modifications promptly. Regularly inspect your hutch for signs of wear and tear, such as loose hinges or damaged wire mesh. Making timely repairs ensures the safety and security of your rabbits while preventing further damage to the structure.
Warnings and Precautions During Building
While building a rabbit hutch can be an enjoyable project, it’s important to be aware of potential risks and hazards involved. Safety precautions should be followed throughout the construction process to minimize accidents or injuries.
One common mistake is overlooking proper handling of tools, materials, and equipment. Ensure you have a good understanding of how to use each tool safely before starting construction. Always wear appropriate protective gear like gloves and safety goggles when necessary.
Another consideration is creating a safe working environment for yourself and others involved in the project. Keep the workspace clean and organized, reducing tripping hazards or cluttered areas that could lead to accidents. If children are participating in building activities, provide clear instructions on safe practices and supervise them closely.
When working with wire mesh or other sharp materials, take extra care to avoid cuts or punctures. Use gloves and handle these materials with caution to prevent injuries. Be mindful of any potential chemical hazards when using sealants or paints and ensure proper ventilation during application.
Kid-Friendly Rabbit Hotel Design
If you’re looking to involve children in the construction process of a rabbit hutch, consider a kid-friendly design that prioritizes safety. This can be an excellent opportunity for children to learn about responsibility and animal care while having fun building a space for their furry friends.
A step-by-step guide suitable for young builders can help simplify the construction process. Break down each task into manageable steps, ensuring clear instructions and illustrations are provided. This allows children to actively participate in assembling the hutch while learning valuable skills along the way.
Creating a fun and engaging space within the hutch is also important for kids’ interaction with their rabbits. Consider adding features like ramps, tunnels, or hiding spots that encourage play and exploration. These additions not only provide entertainment for the rabbits but also foster a bond between children and their pets.
Educational opportunities can arise from involving children in the construction of a rabbit hutch. Use this time to teach them about proper rabbit care, including feeding schedules, grooming needs, and general health checks. By instilling these responsibilities early on, children develop empathy and understanding towards animals.
Conclusion
Congratulations! You have now reached the end of our DIY rabbit hutch guide. By following the steps outlined in this article, you are well on your way to creating a safe and comfortable home for your furry friend. From understanding the basics of rabbit hutches to planning and constructing your own design, we have covered it all.
Now that you have the knowledge and tools to build a rabbit hutch, it’s time to put your skills into action. Remember, building a hutch is not only a fulfilling DIY project but also an opportunity to provide a loving and secure environment for your pet. So gather your materials, unleash your creativity, and embark on this exciting journey of creating a cozy haven for your bunny companion.
Happy building!
Frequently Asked Questions
How big should a DIY rabbit hutch be?
A DIY rabbit hutch should provide ample space for your furry friend to move around comfortably. Aim for a minimum size of 4 square feet per rabbit, with an additional 2-3 square feet for each extra rabbit. It’s important to prioritize their well-being and ensure they have enough room to exercise and explore.
What materials are best for constructing a rabbit hutch?
When building a DIY rabbit hutch, opt for sturdy and non-toxic materials. Consider using untreated wood, wire mesh, and galvanized screws or nails. These materials are durable, safe for rabbits, and will withstand the outdoor elements. Avoid using pressure-treated wood or toxic paints that could harm your rabbits.
Should I include insulation in my rabbit hutch?
Insulation is not necessary for most climates unless you live in an area with extremely cold temperatures. However, providing proper bedding such as straw or hay can help keep your rabbits warm during colder seasons. Ensure the hutch is well-ventilated to prevent moisture buildup and maintain a comfortable environment.
How often should I clean the rabbit hutch?
Regular cleaning is crucial to maintain your rabbits’ health and hygiene. Remove any soiled bedding daily and thoroughly clean the entire hutch at least once a week. This includes scrubbing surfaces, replacing bedding, and disinfecting if necessary. Keeping their living space clean helps prevent odors, pests, and potential health issues.
Can I keep my rabbits outside all year round?
Rabbits can handle various weather conditions but may require additional protection during extreme temperatures. If you choose to keep them outside throughout the year, ensure their hutch is well-insulated during winter months and provides shade during hot summers. Monitor their behavior closely to ensure they’re comfortable in changing weather conditions.
