

Looking to cook and preserve your favorite meals while enjoying a healthier lifestyle? Try vacuum sealing canned chicken. Homemade food dehydration is the answer! Say goodbye to expensive store-bought snacks and hello to a cost-effective way of preserving and savoring your favorite ingredients with vacuum sealing. Extend the shelf life of your canned chicken and cook it whenever you want. With a vertical flow dehydrator, you can easily create delicious dehydrated snacks and meals right in your own kitchen. Rehydrate and cook them whenever you want by vacuum sealing them.
By dehydrating your meals, you not only extend their shelf life but also retain essential nutrients without the need for additives or preservatives. Vacuum sealing is a popular method to preserve and rehydrate dehydrated food. Whether it’s crispy apple chips, savory beef jerky, or flavorful beans and rice, we’ve got you covered with easy-to-follow techniques that will have you enjoying delicious snacks in no time.

Essentials of Food Dehydration
Science Behind Food Dehydration
Food dehydration is a process that removes moisture from food, allowing it to dehydrate and be stored for longer periods without spoiling. This can significantly extend the shelf life of the food. A food dryer is typically used to dehydrate the food, and once it is ready to be consumed, it can be rehydrated. Understanding the science behind food dehydration is essential to dehydrate and ensure the preservation of nutrients, as well as extend the shelf life of meals. Rehydrating dehydrated food can restore its original texture and taste. When food is dehydrated, the water content decreases significantly, extending the shelf life of meals and inhibiting the growth of microorganisms that cause spoilage. Rehydrating vacuum-sealed meals can restore their original texture and taste. This process also helps rehydrate the dehydrated meals and extends their shelf life. It slows down enzymatic reactions and reduces oxidation, retaining vitamins and minerals in the dryer foods.
Methods of Food Dehydration
There are various methods available for food dehydration, including using a dehydrate or dryer. Each method has its own advantages and considerations, especially when it comes to dehydrating meals and fruit. Air drying is one common method where food, including fruit and meals, is left to dry naturally in open air. This process can be done using a dryer or by dehydrating the food. Using a food dryer is a great way to dehydrate fruit. It requires minimal equipment, such as a panel, and can be time-consuming. However, the process is dependent on weather conditions. Another popular method involves using a dehydrator, which uses controlled heat and airflow to efficiently dehydrate fruit by removing moisture. Dehydrators, also known as fruit dryers, offer precise temperature control and faster drying times compared to air drying. These machines are specifically designed to dehydrate fruits and other food items.
Wide Range of Foods That Can Be Dehydrated
Dehydration opens up a world of possibilities. Fruits like apples, bananas, and berries can be dehydrated using a dryer into delicious snacks with concentrated flavors. The process involves placing the fruits on wooden boards and placing them in the dryer’s panel to remove moisture. Fruit, such as tomatoes, can be dehydrated and added to trail mixes or used to stock up on dried snacks. Additionally, vegetables like carrots and peppers can also be dehydrated for soups or trail mixes. Even fruits like dehydrated fruit or wood boards can be made by dehydrating thinly sliced meat strips. Herbs like basil or rosemary can be dehydrated for later use in cooking. Dehydrating the herbs helps to preserve their flavor and aroma. They can be easily stored in airtight containers and will last for a long time. Another benefit of dehydrating herbs is that it reduces waste, as you can use them even after they have dried up. Additionally, dehydrating fruits like apples or strawberries is a great way to enjoy them all year round. Simply slice the fruit and place it on a wood dehydrator tray.
There are endless opportunities for creativity and experimentation with different fruit, boards, ingredients and flavor combinations on top of the side.
Dehydrating your own fruit not only allows you to control the quality of ingredients but also provides a cost-effective way to enjoy nutritious snacks year-round. Using dehydrating boards, you can easily dry your fruit and other foods. The dehydrated fruit can be enjoyed as a side or used as a topping for various dishes. By removing moisture from foods using boards, while retaining their nutritional value, you can create tasty treats that are free from additives or preservatives commonly found in store-bought alternatives. The boards help to remove the moisture from the foods, resulting in delicious treats. These treats can be made using a variety of ingredients and are a healthier option compared to store-bought alternatives.
Choosing Your Food Dehydrator
Choosing the right dehydrator is essential. There are several factors to consider when choosing the top box for your needs, including size and capacity, features, temperature controls, timers, and the square base. Let’s explore these aspects in more detail.
Size and Capacity
The top thing to consider when selecting a food dehydrator is its size and capacity. The box and base are also important factors to take into account. Think about how much food you plan to dehydrate at once. Consider the side, top, box, and base. If you have a large family or want to preserve a substantial amount of produce from your garden, a top box dehydrator with multiple trays and ample space at the side and base would be ideal. On the other hand, if you have limited kitchen space or only need to dehydrate small batches occasionally, a compact dehydrator might be a better fit for you. It can easily be placed on the side or top of your countertop or in a small box.
Features of Dehydrators
There are top food dehydrators available on the market today, ranging from box dehydrators to side dehydrators. Understanding the side, top, and box features can help you make an informed decision.
-
Top Vertical Flow Dehydrators: These top models feature a fan at the top of the box that blows hot air upwards through the trays in the box. This design ensures even drying throughout all the trays.
-
Top Box Horizontal Flow Dehydrators: These top box dehydrators have a fan mounted at the back that blows hot air horizontally across the trays. They offer efficient airflow and consistent drying results.
-
Stackable Dehydrators: As the name suggests, stackable dehydrators allow you to add or remove trays as needed. These stackable dehydrators come in a box and have a top that can be easily opened for tray adjustments. They are versatile and convenient for different batch sizes.
Consider which type of top dehydrator suits your needs best based on factors such as convenience, ease of use, and desired outcome.
Temperature Controls and Timers
Temperature control is crucial in food dehydration because it ensures optimal drying without losing nutrients or flavor. Different foods require specific temperatures for top drying results. Look for a top dehydrator that offers adjustable temperature settings so you can customize it according to your top recipes.
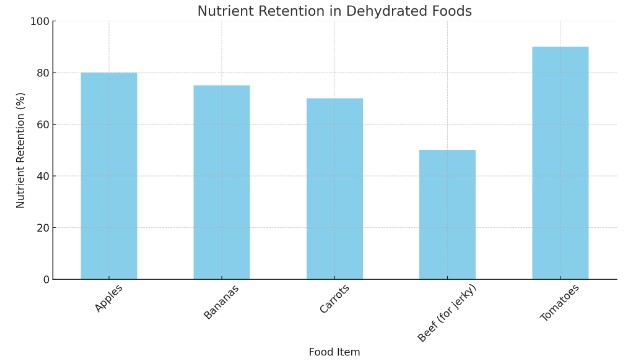
Here is an infographic table that provides a summary of the dehydration and rehydration times, shelf life, and nutrient retention percentages for various foods:
| Food Item | Dehydration Temperature (°F) | Dehydration Time (Hours) | Rehydration Time (Minutes) | Shelf Life (Months) | Nutrient Retention (%) |
|---|---|---|---|---|---|
| Apples | 135 | 7-15 | 10-20 | 10 | 80 |
| Bananas | 135 | 6-10 | 5-10 | 6 | 75 |
| Carrots | 125 | 6-10 | 5-10 | 10 | 70 |
| Beef (for jerky) | 160 | 4-6 | 30-60 | 12 | 50 |
| Tomatoes | 135 | 10-18 | 20-30 | 12 | 90 |
Having a top built-in timer can also be beneficial as it allows you to set the top desired drying time and let the dehydrator do its job without constant monitoring. This top feature is especially useful when you are busy with other tasks or overnight drying.
In addition to these top primary considerations, some dehydrators come with extra features such as nonstick sheets for sticky foods, a vacuum sealer for preserving dehydrated food longer, or a digital display for precise temperature control.
By carefully considering the top size and capacity, type of dehydrator, temperature controls, and timers, you can choose a top food dehydrator that meets your specific needs. Investing in a top-quality dehydrator will not only make your homemade dehydration process more efficient but also ensure top delicious and nutritious results every time.
Preparing for the Dehydration Process
Properly wash, peel, and slice your fruits and vegetables before dehydrating.
Before you begin the dehydration process, it is essential to properly prepare your fruits and vegetables to ensure top-notch results. Start by thoroughly washing the top of them under running water to remove any dirt or debris. This step ensures that you are starting with top-quality, clean produce, reducing the risk of bacterial contamination.
Next, consider peeling certain fruits and vegetables. While some can be dehydrated with their skin intact, others may have a tough or bitter skin that is best removed. For example, when dehydrating apples or pears, it is recommended to peel them first for a more pleasant texture after drying.
Once washed and peeled (if necessary), slice your fruits and vegetables into uniform pieces. This helps ensure even drying throughout the entire batch. Aim for slices that are approximately 1/4 inch thick to promote efficient dehydration.
Blanching techniques for certain foods to enhance their flavor and texture after dehydration.
Blanching is a pre-treatment method that involves briefly immersing certain foods in boiling water followed by immediate cooling in ice-cold water. This technique can greatly enhance the flavor, color, and texture of your dehydrated foods.
To blanch vegetables like carrots or green beans, start by bringing a pot of water to a rolling boil. Add the vegetables and let them cook for about 2-3 minutes until they become slightly tender but still crisp. Then quickly transfer them to a bowl filled with ice-cold water to halt the cooking process.
Blanching helps preserve the vibrant colors of your vegetables while also reducing enzyme activity that can cause loss of flavor during dehydration. It also softens the cell walls slightly, allowing moisture to escape more easily during drying.
Tips for marinating meats and seasoning vegetables before dehydrating them.
Marinating meats before dehydration can add an extra layer of flavor and tenderness to your dried meats. Simply prepare a marinade of your choice using ingredients like soy sauce, Worcestershire sauce, garlic, and spices. Place the meat in a resealable bag or container and let it marinate in the refrigerator for at least a few hours or overnight.
You can use a variety of herbs and spices to enhance their taste. Toss your sliced vegetables with olive oil and sprinkle them with seasonings such as salt, pepper, garlic powder, or dried herbs like rosemary or thyme. This will infuse them with delicious flavors that will intensify during the dehydration process.
By marinating meats and seasoning vegetables before dehydrating them, you are ensuring that they are packed with flavor even after they have been dried. This step adds an extra dimension to your homemade dehydrated foods.
Dehydrating Fruits, Vegetables, and Herbs
Ideal Temperature and Time Settings for Dehydrating Different Types of Fruits
Finding the ideal temperature and time settings is crucial to ensure proper dehydration while preserving their flavor and nutritional value. Each type of fruit requires specific conditions for optimal results.
For berries like strawberries or blueberries, a temperature range of 125-135°F (52-57°C) is recommended. These delicate fruits should be spread out in a single layer on the dehydrator trays and typically take around 8-12 hours to dry completely.
Citrus fruits such as oranges or lemons can be dried at a slightly higher temperature of 135-145°F (57-63°C). They should be sliced thinly and evenly before placing them on the trays. The drying process usually takes about 10-14 hours.
Apples, pears, and peaches are best dehydrated at temperatures between 125-135°F (52-57°C). It’s important to slice them uniformly to ensure even drying. Depending on the thickness of the slices, it may take anywhere from 6 to 12 hours for these fruits to become fully dehydrated.
Proper Preparation Techniques for Dehydrating Vegetables
Proper preparation techniques are essential in order to maintain their nutritional value throughout the dehydration process. Here are some guidelines:
-
Wash the vegetables thoroughly before starting.
-
Peel if necessary and remove any blemishes.
-
Slice them into uniform pieces or strips for even drying.
-
Blanching certain vegetables like carrots or green beans before dehydration can help preserve their color and texture.
-
Spread the prepared vegetables in a single layer on the dehydrator trays.
-
Set the temperature between 125-135°F (52-57°C) for most vegetables.
-
Depending on the type of vegetable, dehydration times can range from 6 to 12 hours.
By following these steps, you can ensure that your dehydrated vegetables retain their nutritional content and are ready for use in soups, stews, or as healthy snacks.
Best Practices for Drying Herbs
Drying herbs is a wonderful way to preserve their aroma and flavor for future culinary endeavors. Here are some best practices to keep in mind:
-
Harvest fresh herbs early in the morning when their essential oils are at their peak.
-
Gently rinse the herbs under cold water to remove any dirt or debris.
-
Pat them dry with a clean kitchen towel or paper towels.
-
Remove any tough stems and separate the leaves from the stalks.
-
Arrange the herb leaves on dehydrator trays, ensuring they are evenly spaced out.
-
Set the temperature between 95-105°F (35-40°C) for drying herbs.
Dehydrating Meat, Seafood, and Poultry
Dehydrating meat, seafood, and poultry is a great way to preserve these protein-rich foods for longer periods. However, it is crucial to follow safety guidelines to prevent bacterial growth and ensure the safety of the dehydrated products.
Safety Guidelines for Dehydrating Meat Products
When dehydrating meats, it’s essential to take extra precautions due to the risk of food poisoning. Here are some safety guidelines to keep in mind:
-
Ensure that the meat is fresh and of high quality before dehydration. Avoid using expired or spoiled meat.
-
Thoroughly clean all equipment, utensils, and surfaces that will come into contact with the meat.
-
Cook or partially cook the meat before dehydration to destroy any harmful bacteria present. This step can be done by boiling or baking the meat until it reaches a safe internal temperature.
-
Use a food thermometer to ensure that the meat reaches an internal temperature of at least 160°F (71°C) for beef, pork, veal, and lamb; 165°F (74°C) for poultry; and 145°F (63°C) for fish.
-
Consider marinating the meat before dehydration with your choice of seasonings or marinades. This not only enhances flavor but also helps inhibit bacterial growth.
Techniques for Pre-cooking or Partially Cooking Meats
Pre-cooking or partially cooking meats before dehydration can help reduce drying time while ensuring that harmful bacteria are destroyed. Here are two common techniques:
-
Boiling: Place the meat in a pot of boiling water and cook until it reaches a safe internal temperature as mentioned earlier. Once cooked, remove from heat and allow it to cool before proceeding with dehydration.
-
Baking: Place the meat on a baking sheet lined with parchment paper and bake in an oven preheated to the appropriate temperature until fully cooked. Again, let it cool before dehydrating.
By pre-cooking or partially cooking the meat, you can minimize the risk of bacterial growth and ensure that your dehydrated products are safe to consume.
Enhancing the Taste of Dehydrated Meat, Seafood, and Poultry
Dehydrated meats can sometimes lack flavor compared to their fresh counterparts. To enhance the taste of your dehydrated meat, seafood, and poultry, consider experimenting with different marinades and seasonings. Here are some ideas:
-
Teriyaki Marinade: Combine soy sauce, brown sugar, garlic powder, ginger powder, and a splash of pineapple juice for a sweet and savory teriyaki flavor.
-
BBQ Seasoning: Create a homemade BBQ seasoning blend using paprika, brown sugar, salt, pepper, garlic powder, onion powder, and chili powder. Sprinkle this mixture on your meats before dehydration for a smoky BBQ taste.
Crafting Dehydrated Meals for Backpacking
Creating lightweight and nutritious backpacking meals is essential for any outdoor enthusiast. One way to achieve this is by utilizing homemade food dehydration techniques. By dehydrating ingredients, you can reduce weight and extend the shelf life of your meals, making them perfect for backpacking trips or camping adventures.
Combine Dehydrated Ingredients for Balanced Nutrition
When crafting dehydrated meals, it’s important to consider nutrition. A balanced diet is crucial during physically demanding activities like hiking or camping. By combining dehydrated ingredients such as vegetables, fruits, grains, and proteins, you can create meals that provide a variety of nutrients.
For example, you could make a delicious trail mix by combining dehydrated fruits like bananas and berries with nuts and seeds. This snack provides a good balance of carbohydrates, healthy fats, and protein to keep you energized on the trail.
Meal Planning and Portioning Tips
Effective meal planning is key when preparing backpacking meals. Consider how many days you will be on your trip and plan accordingly. Divide your meals into individual portions to ensure you have enough food for each day without carrying unnecessary weight.
A great tip is to use mylar bags or ziplock bags to store each meal separately. Label them with the date and contents so that they are easy to identify when you’re out in the wilderness.
Another consideration is portion control. While it may be tempting to pack large servings of your favorite foods, remember that every ounce adds up when you’re carrying everything on your back. Aim for smaller portions that still provide adequate nutrition while keeping weight in mind.
Creative Recipes for Easy Rehydration
Rehydrating dehydrated meals on the go should be quick and hassle-free. To achieve this, choose recipes that rehydrate easily with minimal cooking time or effort.
| Food Item | Temperature Range (°F) | Average Dehydration Time (hrs) | Preparation Tips | Rehydration | Shelf Life (months) |
|---|---|---|---|---|---|
| Fruits | 125-135 | 8-12 | Slice evenly, pretreat to prevent browning. | Soak in water or add directly to recipes. | 10-12 |
| Vegetables | 125-135 | 6-12 | Wash, peel, slice/blanch for color retention. | Soak or steam until tender. | 8-10 |
| Meats | 145-155 | 4-8 | Trim fat, marinate for flavor, pre-cook to ensure safety. | Soak in warm water or cook to desired texture. | 2-6 |
| Herbs | 95-105 | 1-4 | Rinse, pat dry, remove stems. | Crush and add directly to dishes. | 12-18 |
For example, a simple pasta dish can be made by combining dehydrated pasta, vegetables, and a sauce mix. Just add boiling water to the ingredients in a heatproof container or ziplock bag, seal it, and let it sit for a few minutes until everything is fully rehydrated. This way, you can enjoy a hot meal without spending too much time cooking.
Another option is to create dehydrated soups or stews. By dehydrating all the ingredients separately and then combining them in one bag, you can have a hearty meal ready to go. Just add boiling water and let it simmer for a few minutes before enjoying a warm and comforting bowl of soup.
By utilizing homemade food dehydration techniques, you can create lightweight and nutritious backpacking meals that are easy to rehydrate on the go. With careful meal planning, portioning, and creative recipes, you’ll be able to fuel your outdoor adventures while keeping your pack light.
DIY Food Dehydrator Plans
If you’re interested in preserving your food and creating delicious homemade snacks, building your own food dehydrator can be a fun and rewarding project.
Step-by-Step Instructions for Building Your Own Food Dehydrator
To start building your own food dehydrator, you’ll need a few basic materials and tools. Here’s a step-by-step guide to help you get started:
-
Gather the Materials: You will need plywood or other suitable material for the frame, wire mesh or trays for drying the food, screws or nails to assemble the dehydrator, and hinges for easy access.
-
Design the Frame: Decide on the dimensions of your dehydrator based on your needs and available space. Cut the plywood into panels according to these dimensions.
-
Assemble the Frame: Use screws or nails to connect the panels together, forming a box-like structure. Make sure it is sturdy enough to hold the weight of the food and withstand heat.
-
Add Ventilation Holes: Drill small holes in one side of the frame to allow airflow throughout the dehydrator. These holes will help circulate hot air evenly and promote efficient drying.
-
Install Wire Mesh or Trays: Depending on your preference, you can either attach wire mesh directly onto each shelf of your dehydrator or use removable trays made from wire mesh or food-grade plastic.
-
Create an Access Door: Attach hinges to one side of the frame and add a door that allows easy access to load and unload food from your dehydrator.
-
Add Heat Source: If you prefer a solar-powered dehydrator, position it in an area with direct sunlight exposure. Alternatively, you can use an electric heating element or a light bulb to generate heat within the dehydrator.
Materials and Tools Required for Constructing a DIY Dehydrator
Building your own food dehydrator requires some basic materials and tools. Here’s what you’ll need:
-
Plywood or other suitable material for the frame
-
Wire mesh or trays for drying the food
-
Screws or nails for assembly
-
Hinges for creating an access door
-
Drill to create ventilation holes
-
Saw for cutting plywood panels to size
Different Design Options: Solar-Powered and Stackable Dehydrators
When constructing your DIY dehydrator, you have the option to choose between different designs based on your preferences and needs. Two popular options are solar-powered dehydrators and stackable dehydrators.
Solar-Powered Dehydrators: These dehydrators utilize the power of the sun to dry food. They typically consist of a box-like structure with a transparent top panel that allows sunlight in.
Storing and Rehydrating Your Dehydrated Delights
Proper Packaging Techniques
To maintain the quality and extend the shelf life of your dehydrated foods, proper packaging techniques are essential. One effective method is to use airtight containers or vacuum-sealed bags. These prevent air and moisture from seeping in, which can cause spoilage or mold growth. Make sure to remove as much air as possible before sealing the containers or bags to maximize freshness. Consider using oxygen absorbers to further prolong the shelf life of your dehydrated delights.
Storing in Ideal Conditions
Finding the right storage location for your dehydrated foods is crucial. Aim for a cool, dry place away from direct sunlight and moisture. Exposure to heat and light can degrade the quality of your dehydrated items, leading to flavor loss and nutrient degradation. A pantry or cupboard that maintains a consistent temperature is an ideal choice. Avoid storing them near stoves, ovens, or windows where they may be exposed to heat or sunlight.
Rehydration Methods
When it’s time to enjoy your dehydrated treats, rehydration is key to bringing back their original texture and taste. There are several methods you can use depending on the type of food you’re rehydrating:
-
Water Soaking: This method involves placing your dehydrated food in a bowl of water and allowing it to soak until it reaches its desired consistency. It works well for fruits, vegetables, and certain types of meat.
-
Boiling: For quicker rehydration, boiling is an excellent option. Simply add your dehydrated food to a pot of boiling water and let it cook until tender.
-
Steam Rehydration: This method is particularly suitable for delicate foods like herbs or leafy greens that may lose their texture if soaked in water.
-
Cold Water Rehydration: Some foods such as jerky or dried fruits can be rehydrated by soaking them in cold water for a longer period. This method helps retain their chewy texture.
Experiment with different rehydration methods to find what works best for each type of dehydrated food you have. Remember to follow the instructions provided with your dehydrator or consult reliable sources for specific recommendations.
By properly packaging and storing your dehydrated foods, you can enjoy their delicious flavors and nutritional benefits for an extended period. Rehydrating them using appropriate methods will bring back their original taste and texture, transforming them into satisfying snacks or ingredients for your favorite recipes. So go ahead, get creative with your homemade food dehydration journey, and savor the convenience and flavor of your separate snack creations!
Understanding the Science of Food Dehydration
Water Activity and Microbial Growth
Water activity plays a crucial role in the preservation process of dehydrated foods. It refers to the amount of water available for microbial growth in a food product. When food is dehydrated, the water content is significantly reduced, which inhibits the growth of bacteria, yeast, and molds that are responsible for spoilage. By lowering the water activity below a certain threshold, typically around 0.6, we create an environment where these microorganisms cannot thrive.
Enzymes and Oxidation in Preservation
Enzymes are biological catalysts that facilitate chemical reactions within living organisms. They play an important role in various physiological processes, including food deterioration. When fruits and vegetables are exposed to air during dehydration, enzymes present in these foods can cause undesirable changes such as browning or loss of nutrients.
To prevent enzymatic reactions from occurring during dehydration, it’s essential to treat fruits and vegetables with an anti-enzyme solution before drying them. This solution helps denature or deactivate the enzymes, preserving both the color and nutritional value of the food.
Oxidation is another process that can affect dehydrated foods. When oxygen reacts with certain compounds in food, it can lead to off-flavors and nutrient degradation. To minimize oxidation during dehydration, it’s recommended to use antioxidant treatments like citric acid or ascorbic acid (vitamin C). These antioxidants help inhibit oxidation reactions and preserve the quality of dehydrated foods.
The Role of Temperature
Temperature is a critical factor. It affects both the rate at which moisture is removed from the food and the overall quality of the final product.
Higher temperatures can speed up dehydration but may also result in uneven drying or loss of flavor and nutrients. On the other hand, lower temperatures may take longer but often yield better results in terms of taste, texture, and nutrient retention.
In general, a temperature range of 130-140°F (54-60°C) is recommended for most fruits and vegetables. However, some foods may require higher temperatures to ensure microbial safety. It’s important to follow specific guidelines for each type of food to achieve optimal results.
Benefits of Homemade Food Dehydration
Homemade food dehydration offers several advantages over store-bought dehydrated products. First and foremost, it allows you to have full control over the quality and ingredients used in the process. You can choose organic produce or add your own seasonings without any additives or preservatives.
Homemade dehydration is a cost-effective way to preserve excess fruits and vegetables from your garden or take advantage of seasonal produce when it’s abundant and affordable. It also enables you to customize the size and shape of the dried pieces according to your preference.
Conclusion
Congratulations! You are now equipped with all the knowledge you need to become a homemade food dehydration expert. By understanding the essentials of food dehydration, choosing the right dehydrator, and mastering the techniques for dehydrating various foods, you can enjoy the benefits of delicious and nutritious dehydrated meals. Whether you’re a backpacker looking for lightweight and convenient meals or simply want to preserve your garden’s harvest, homemade food dehydration is a game-changer.
So, what are you waiting for? Dust off that dehydrator, gather your favorite fruits, vegetables, meats, and herbs, and embark on your culinary adventure. Experiment with different flavors and combinations to create your own unique dehydrated delights. Not only will you have a pantry full of healthy snacks and ingredients, but you’ll also gain a new appreciation for the art of preserving food. Get ready to savor the taste of success!