
Introduction
This post outlines the journey of constructing a portable chainsaw sawmill. It delves into the author’s inspirations, the support received from local businesses in Fort Smith, and explores the various sawmill types, highlighting the project’s duration and the meticulous planning and construction phases.
The Motivation Behind the Project
Choosing the Sawmill Type
Sawmill owners often debate the merits of different sawmill types: chainsaw, bandsaw, swinger, and circular mills. The author emphasizes that the choice largely depends on personal preference and intended use, leading to the decision to construct a chainsaw sawmill tailored to his needs.
Construction Journey
Planning and Design
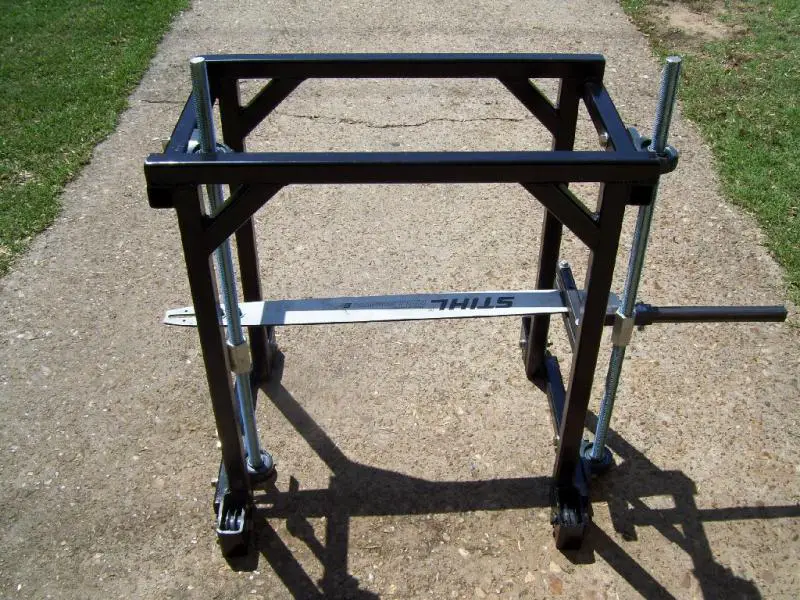
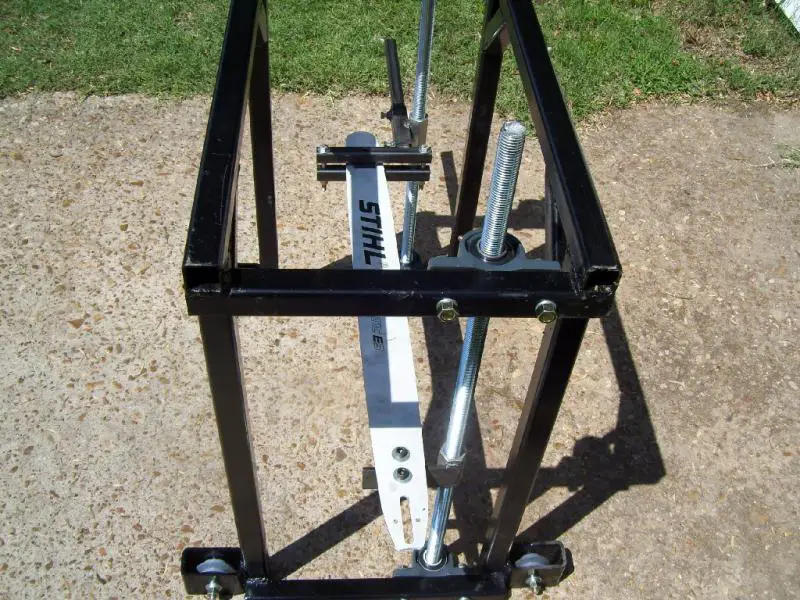
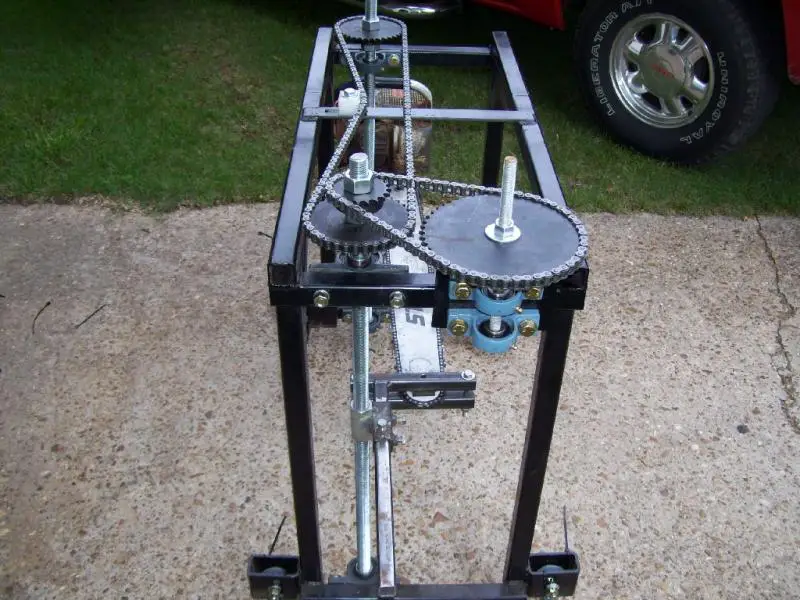
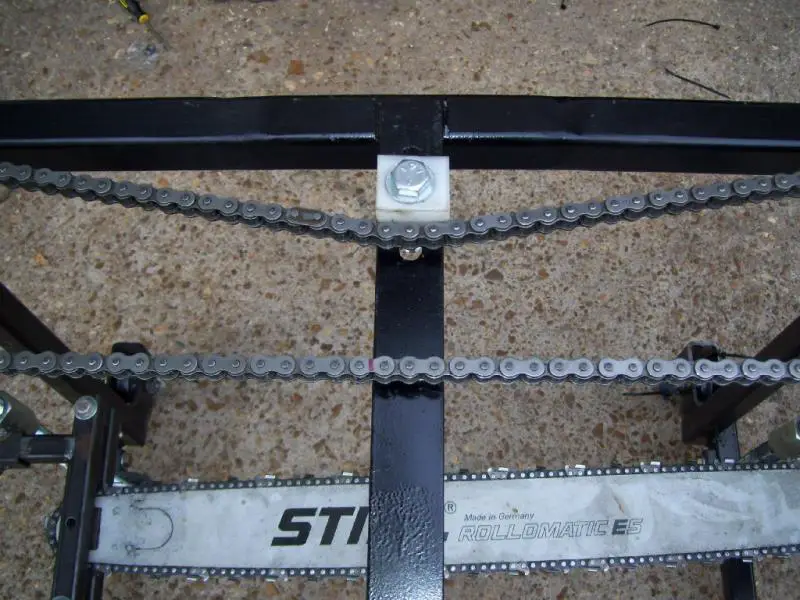
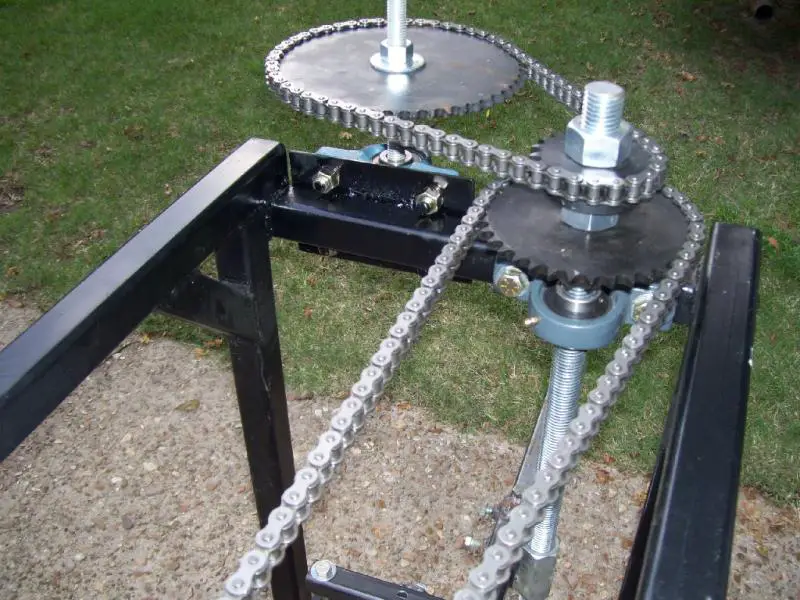
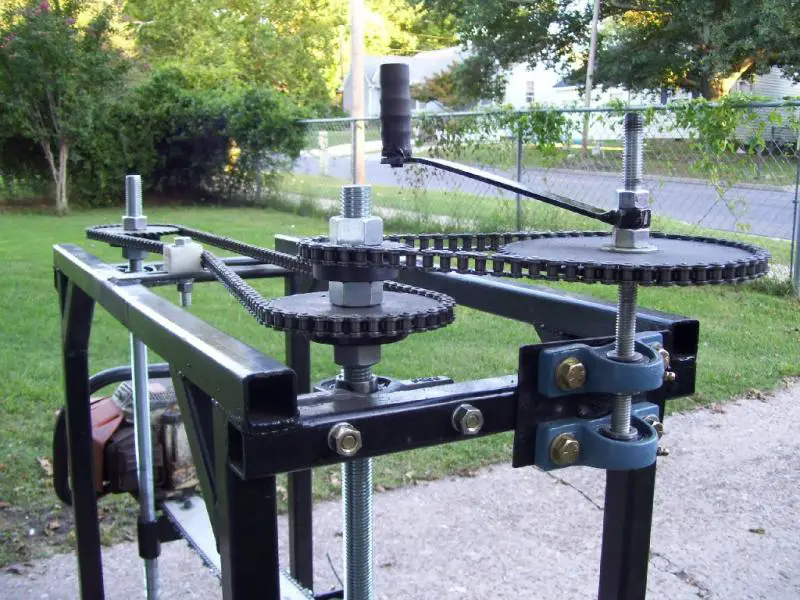
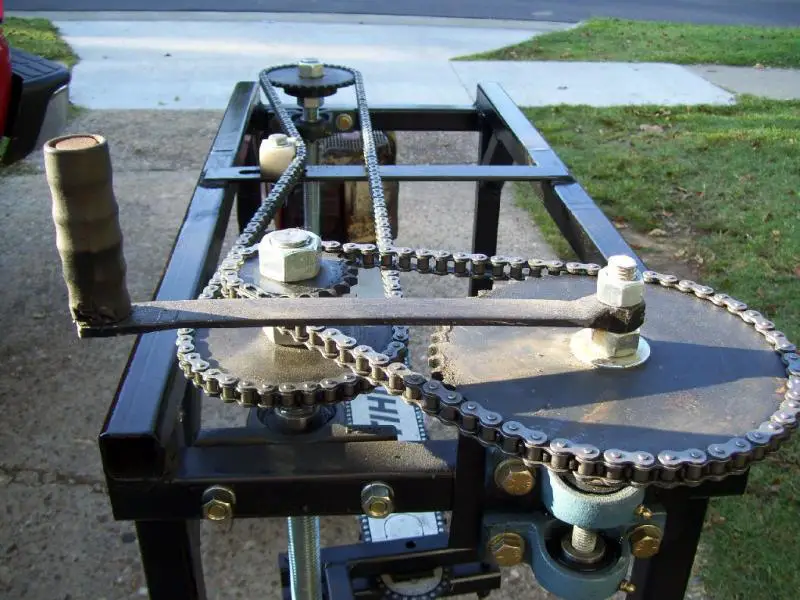
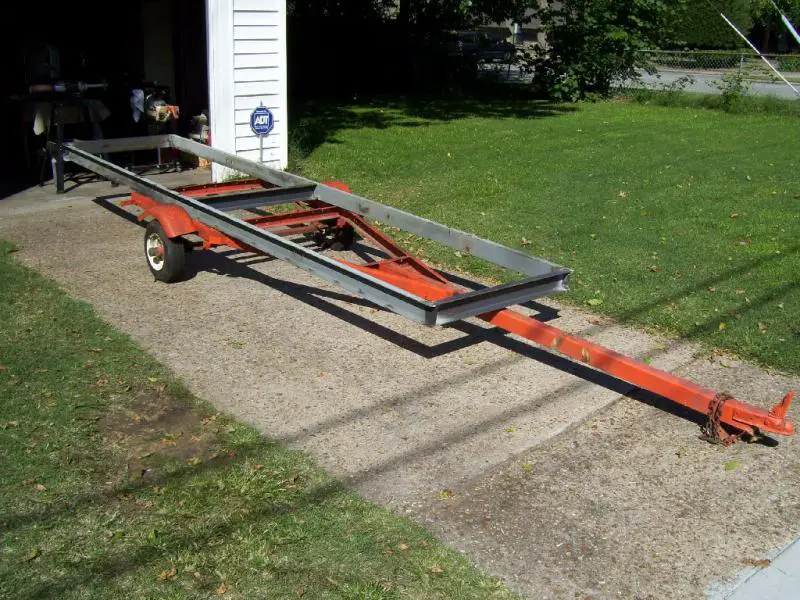
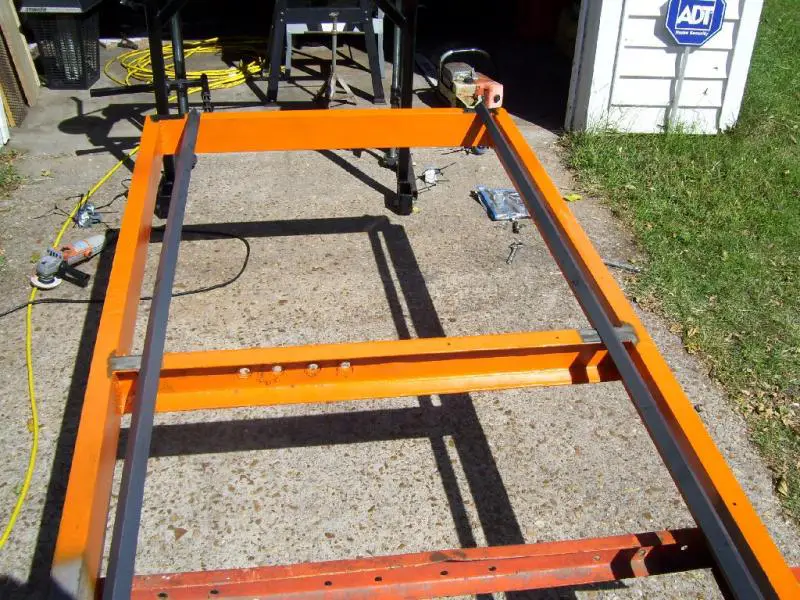
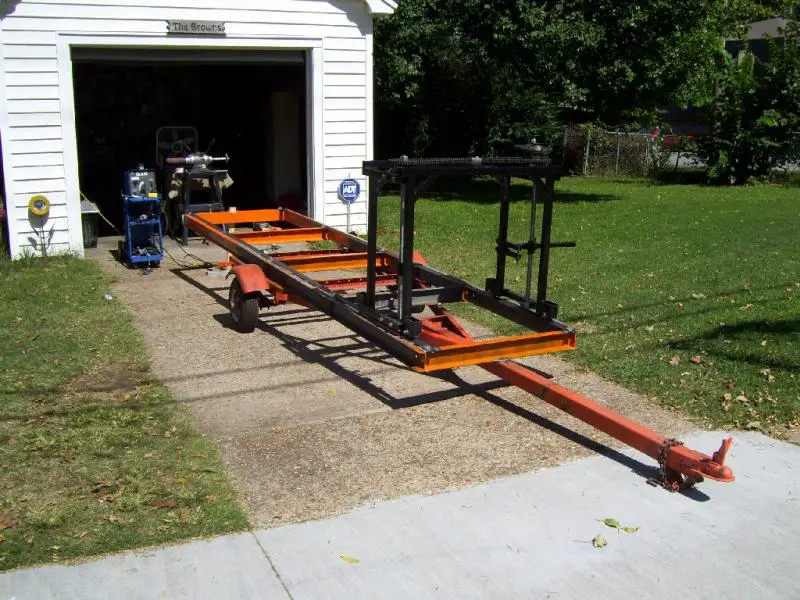
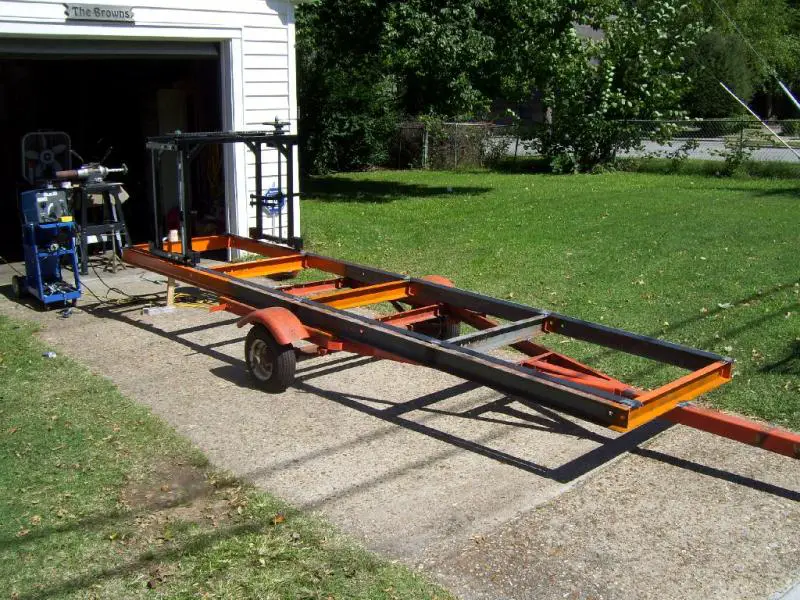
The mill’s journey began with an 18-month planning phase. This period involved thorough research, design iterations, and gathering necessary parts. The Sawmill is powered by a modified Stihl 066 chainsaw with a 32 inch bar.
Building Process
The construction, spanning 3 months, was a collaborative effort with Chuck. The extended timeline was attributed to continuous modifications and enhancements to ensure the mill met the author’s precise requirements.
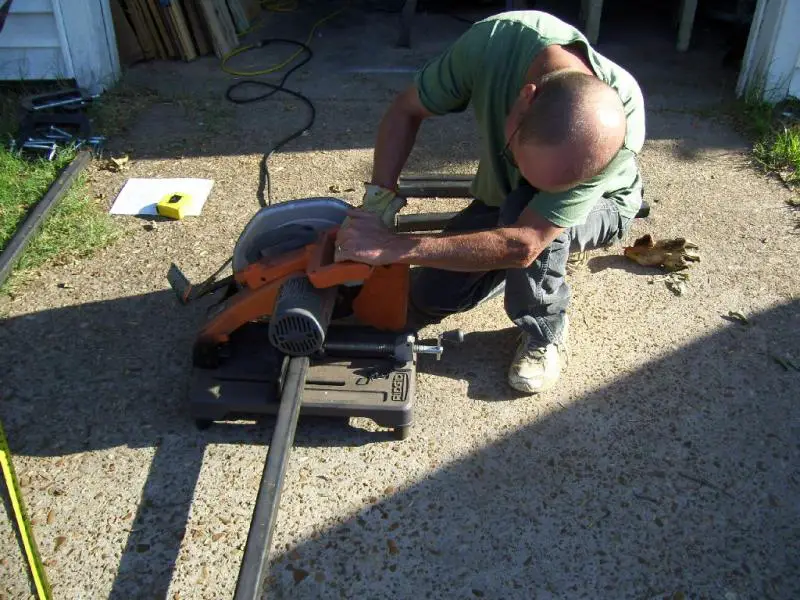


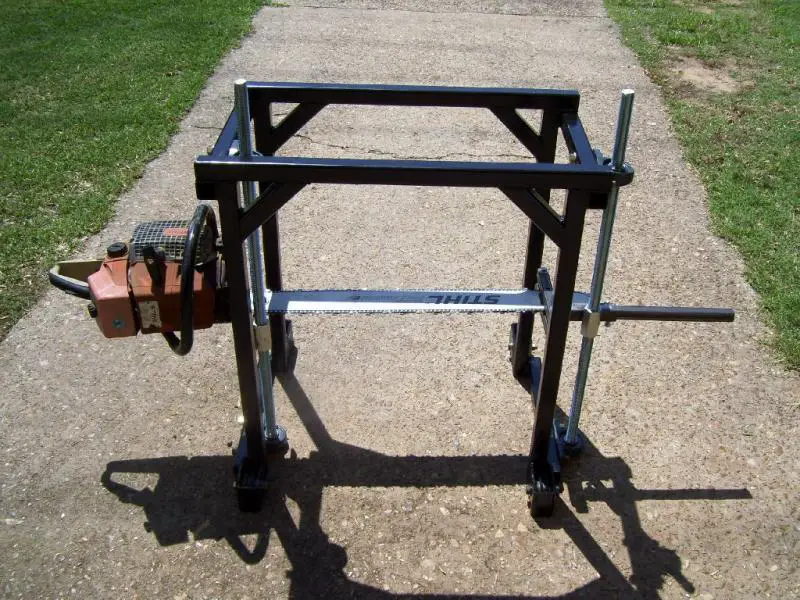
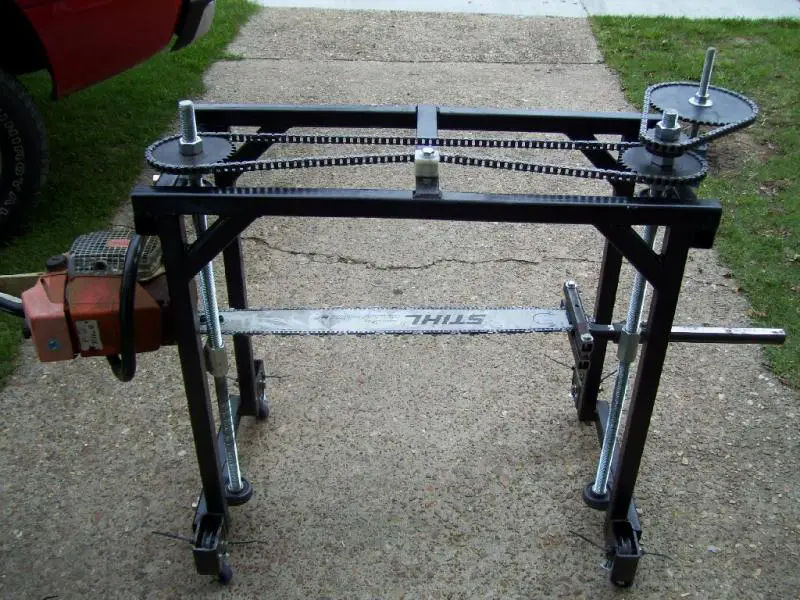

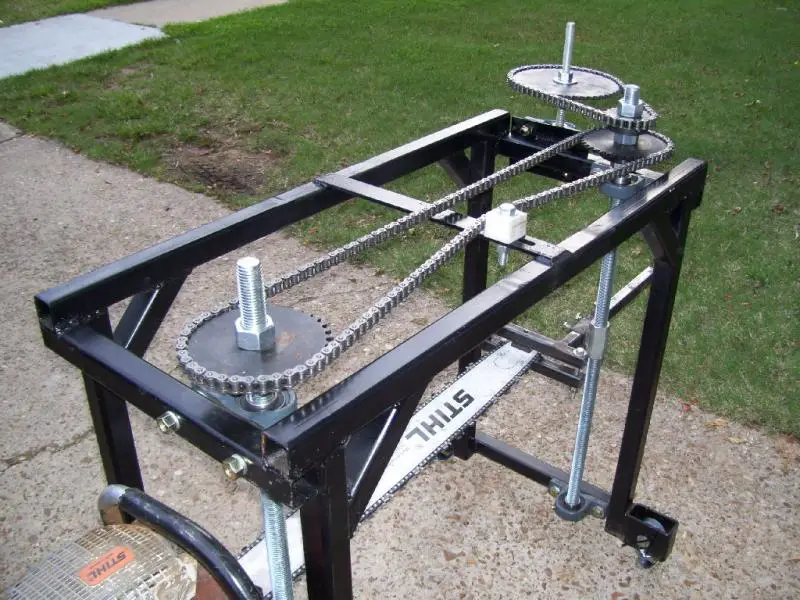
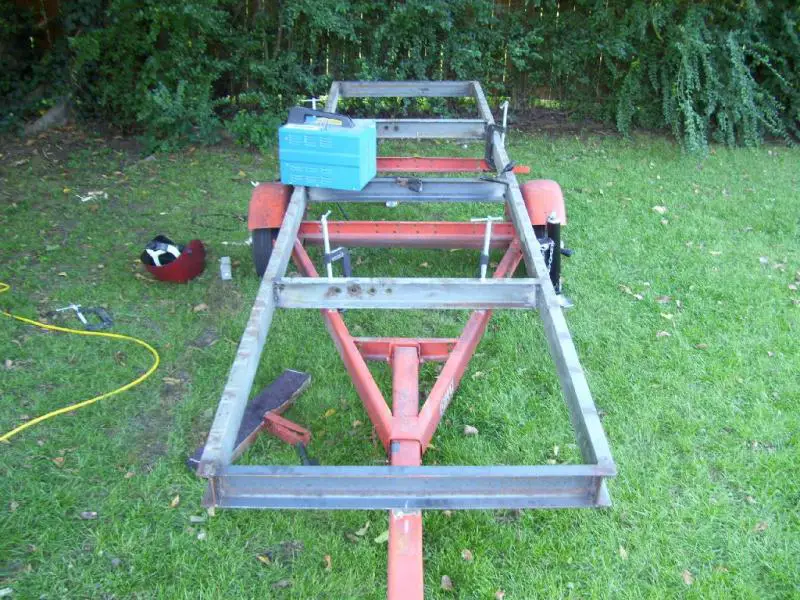
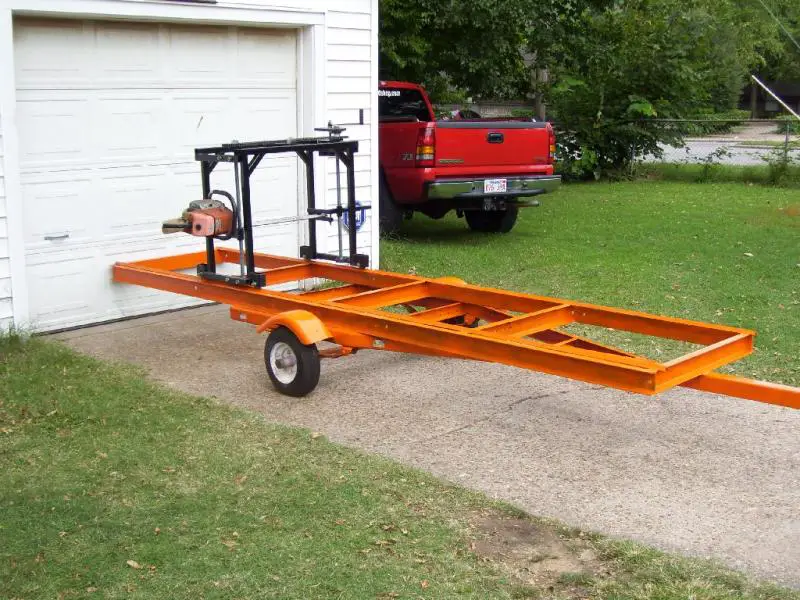


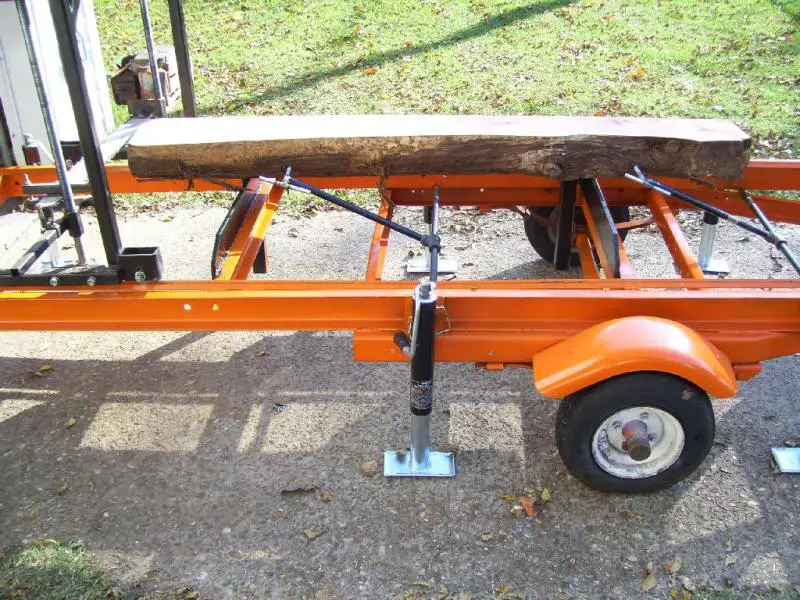
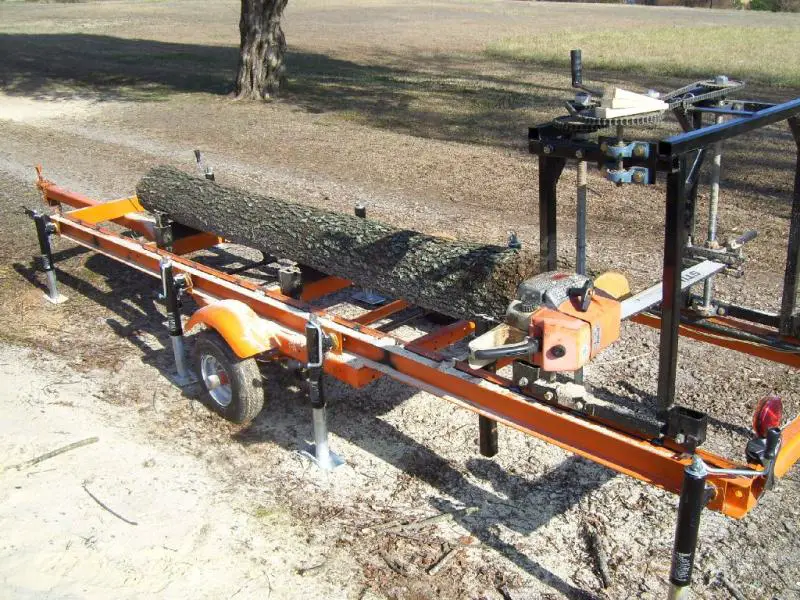
While I was milling some cherry Chuck used a pump up sprayer to spray water on the tip of the sawbar.
Big thanks to TJ Brown and Chuck for this amazing Home-Built Portable Chainsaw Mill!!!
Home-Built Portable Chainsaw Mill: A Comprehensive Guide
Looking to turn your own lumber with a fraction of the cost? Welcome to the world of home-built portable chainsaw mills. These DIY wonders have been gaining popularity among woodworking enthusiasts and homesteaders alike.
Unlike traditional sawmills, which can be expensive and require extensive space, home-built portable chainsaw mills offer an affordable and compact alternative. With just a few simple tools and materials, you can construct your very own mill that allows you to cut logs into custom-sized boards right in your backyard.
Get ready to embark on a journey where you can transform raw logs into beautiful pieces of lumber. So buckle up and let’s dive into the world of home-built portable chainsaw mills!
Benefits of Using a Home-Built Portable Chainsaw Mill
Cost savings compared to purchasing a commercial mill
One of the major benefits of using a home-built portable chainsaw mill is the significant cost savings it offers compared to purchasing a commercial mill. Building your own mill allows you to utilize materials that are readily available and affordable, reducing the overall cost of construction. You have the flexibility to choose components and features that fit within your budget, ensuring that you get the most value for your money.
Customization options for specific milling needs
Another advantage of a home-built portable chainsaw mill is the ability to customize it according to your specific milling needs. When constructing your own mill, you have complete control over its design and functionality. You can tailor it to accommodate different log sizes, adjust cutting depths, and incorporate additional features such as adjustable guides or attachments for specialized cuts. This level of customization ensures that you can achieve precise results and maximize efficiency in your milling projects.
Portability and convenience for on-site milling projects
The portability and convenience offered by a home-built portable chainsaw mill make it an ideal choice for on-site milling projects. Unlike larger commercial mills, which require transportation to different locations, a portable chainsaw mill can be easily transported from one site to another. This eliminates the need for costly transportation fees or renting heavy machinery. Whether you’re working in remote areas or simply want the flexibility to move around your property, a home-built portable chainsaw mill provides unmatched convenience.
These mills are designed with ease of use in mind, making them accessible even for beginners. With proper planning and setup, anyone can operate a home-built portable chainsaw mill efficiently and safely. The lightweight nature of these mills allows for effortless maneuverability while still maintaining stability during operation.
Furthermore, using a home-built portable chainsaw mill enables you to take advantage of timber resources available on your property without the need to transport logs elsewhere for milling. This not only saves time and money but also reduces the environmental impact associated with log transportation.
Essential Tools and Materials for Building a Chainsaw Mill
Necessary Tools for Constructing a Chainsaw Mill
To build a home-built portable chainsaw mill, you will need several tools to ensure the construction process goes smoothly. Here is a list of essential tools:
-
Chainsaw: The heart of any chainsaw mill project is, of course, the chainsaw itself. Make sure you have a reliable and powerful chainsaw that can handle the demands of cutting through lumber.
-
Bandsaw: While not necessary, having access to a bandsaw can greatly assist in making precise cuts during the construction process. A bandsaw allows you to create straight and accurate cuts on larger pieces of wood before using the chainsaw mill.
-
Measuring Tape: Accurate measurements are crucial when building a chainsaw mill. A measuring tape will help you ensure that your cuts are precise and that all components fit together properly.
-
Drill: You will need a drill to create holes for bolts and screws as you assemble the various parts of your chainsaw mill.
-
Wrench Set: A set of wrenches will be necessary to tighten bolts and nuts securely throughout the construction process.
-
Clamps: Clamps are useful for holding pieces together while you work on assembling them or making adjustments.
-
Level: A level is essential for ensuring that your chainsaw mill is straight and level, which is crucial for producing accurate cuts.
-
Safety Equipment: Safety should always be a top priority when working with power tools. Make sure to have safety goggles, ear protection, gloves, and appropriate clothing to protect yourself during construction.
Recommended Materials for Durability and Stability
When building your home-built portable chainsaw mill, it’s important to choose materials that are durable and provide stability during use. Here are some recommended materials:
-
Steel or Aluminum: For the main frame and support structures, using steel or aluminum will provide strength and stability. These materials can withstand the forces generated by the chainsaw and ensure that your mill remains sturdy.
-
Hardwood: When selecting wood for the cutting bed or other components, choose a hardwood like oak or maple. Hardwoods are more resistant to wear and tear, ensuring that your chainsaw mill will last longer.
-
Bolts and Screws: Opt for high-quality bolts and screws made from stainless steel or galvanized steel. These materials are less likely to rust or corrode over time, which can weaken the structure of your chainsaw mill.
Safety Equipment Required During the Building Process
Building a chainsaw mill requires careful attention to safety.
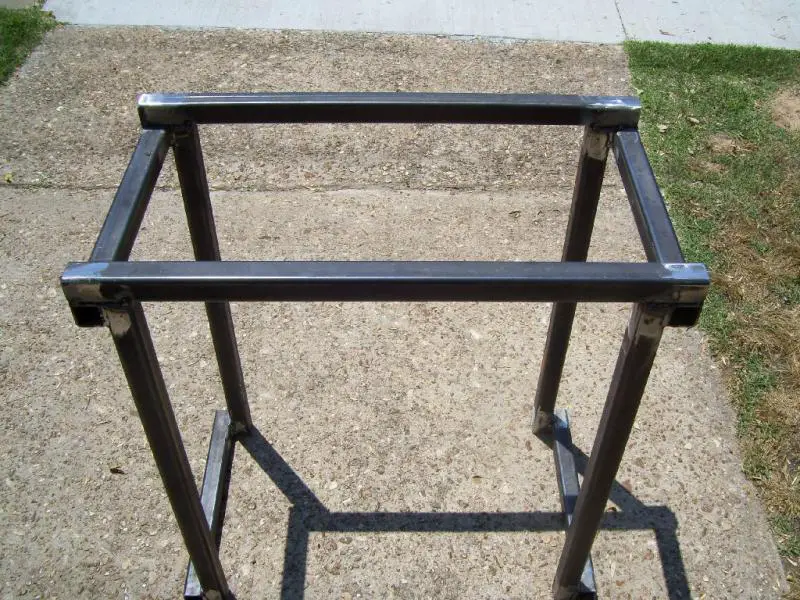
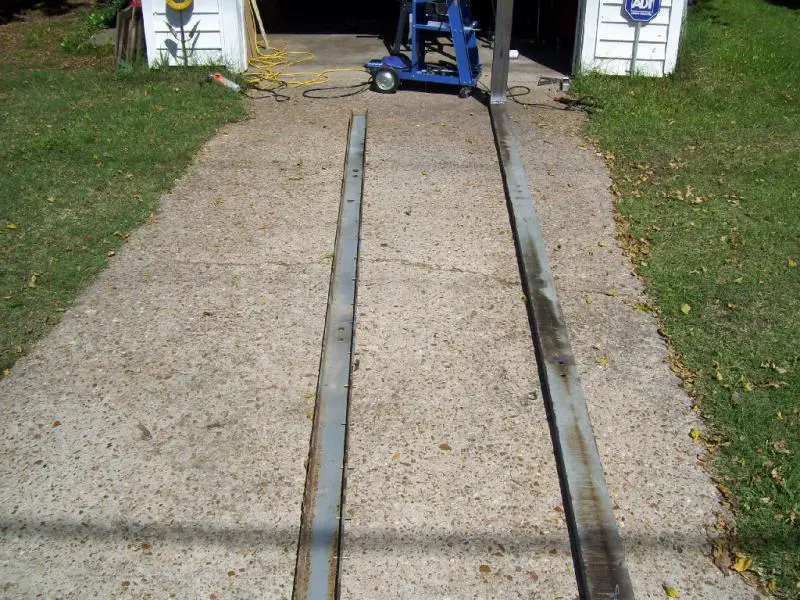
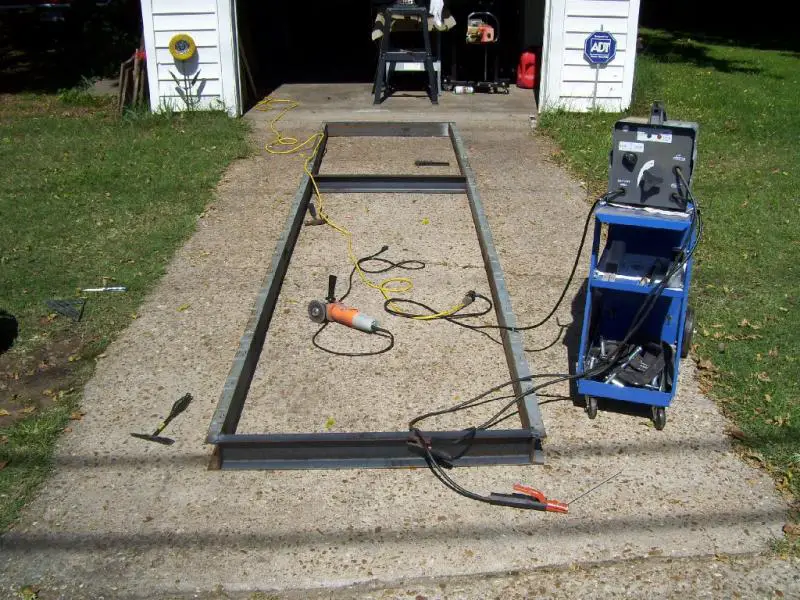
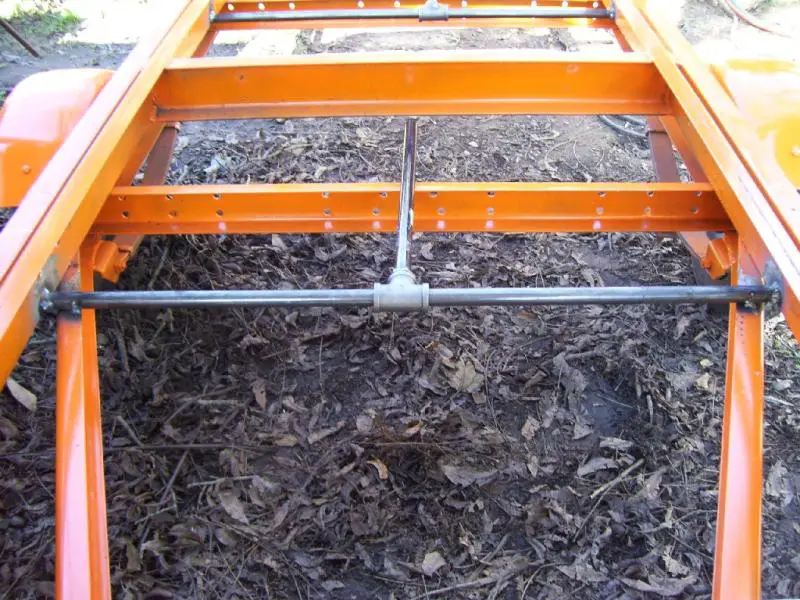
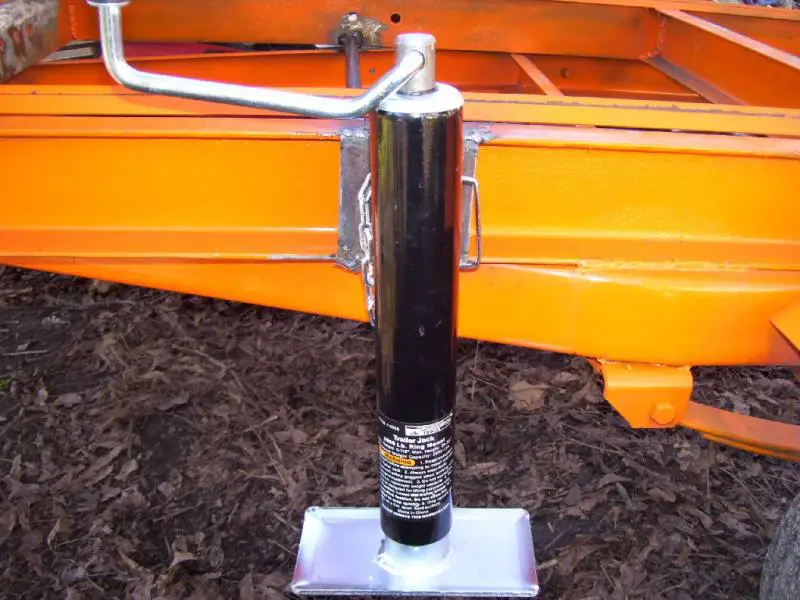
Constructing the Mill’s Foundation: Rails and Support
One of the most crucial aspects is constructing a sturdy foundation. A solid foundation ensures stable milling operations and enhances the overall performance of the mill.
Importance of a Sturdy Foundation for Stable Milling Operations
A strong and stable foundation is essential for several reasons. Firstly, it provides stability to the entire mill structure, preventing any unnecessary movement or vibrations during the milling process. This stability is crucial as it ensures accurate cuts and reduces the risk of accidents or injuries.
Secondly, a well-built foundation helps distribute the weight of the mill evenly, minimizing strain on individual components such as the carriage or frame. This not only improves durability but also extends the lifespan of your chainsaw mill.
A sturdy foundation acts as a buffer against external factors such as uneven ground surfaces or rough terrain. It helps maintain balance and prevents any tilting or wobbling that could affect cutting precision.
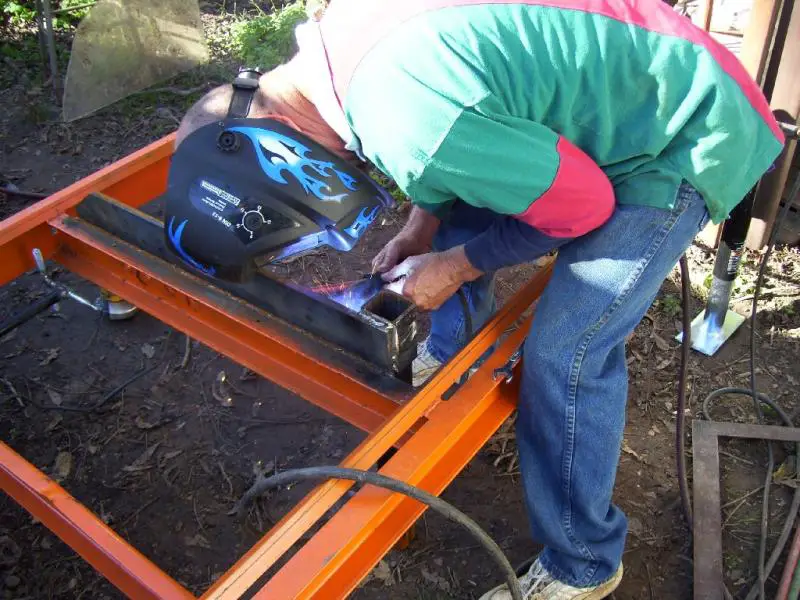
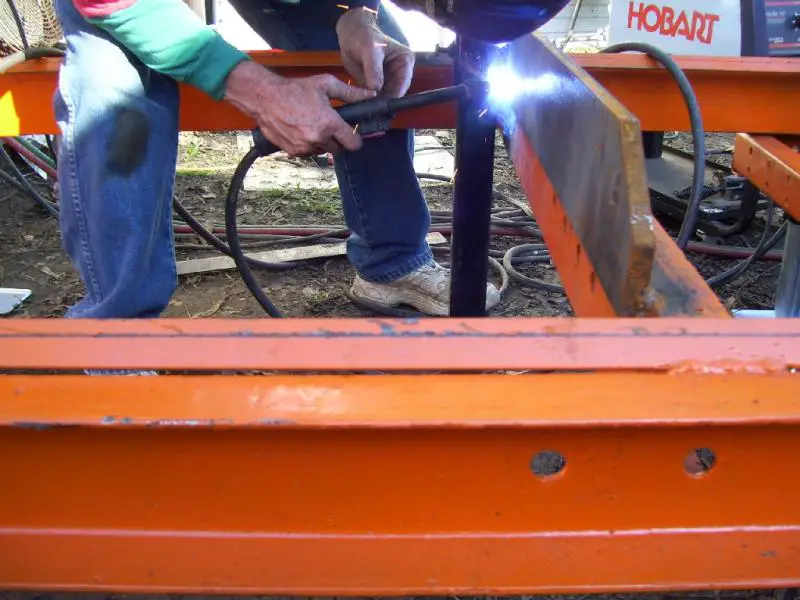
Step-by-Step Guide to Building Rails and Support Structures
To construct rails and support structures for your home-built portable chainsaw mill, follow these steps:
-
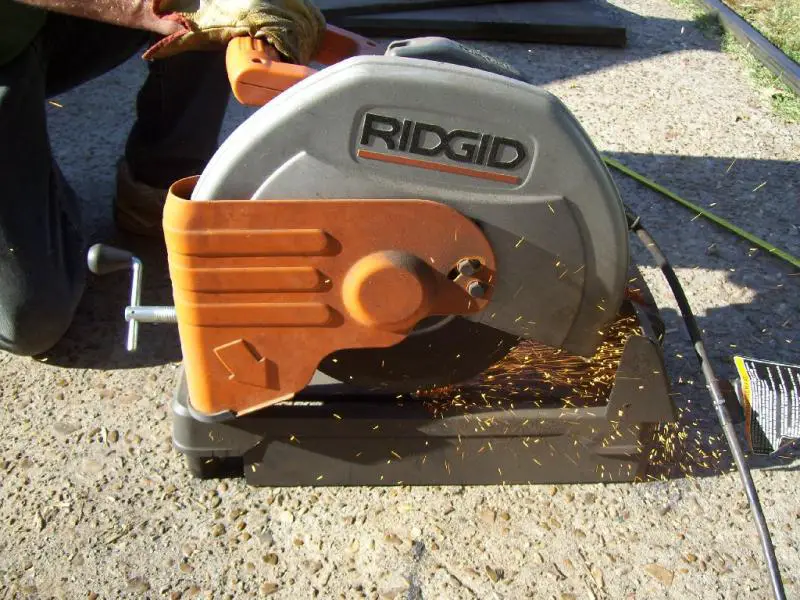
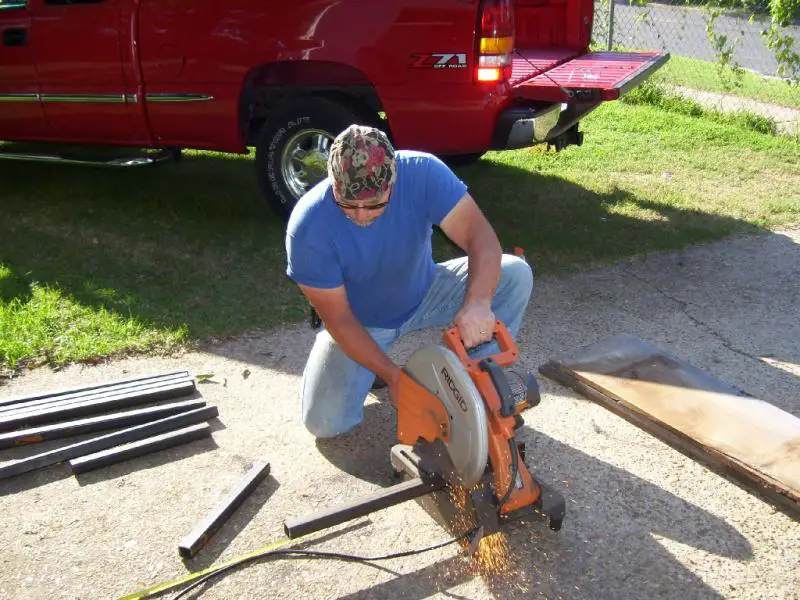
Choose Suitable Materials: Opt for heavy wall steel pipes or square tubing as they provide excellent strength and durability.
-
Measurements: Determine the desired length and height for your rails based on your milling requirements.
-
Prepare Rails: Cut the steel pipes or square tubing according to your measurements using appropriate tools such as an angle grinder or metal saw.
-
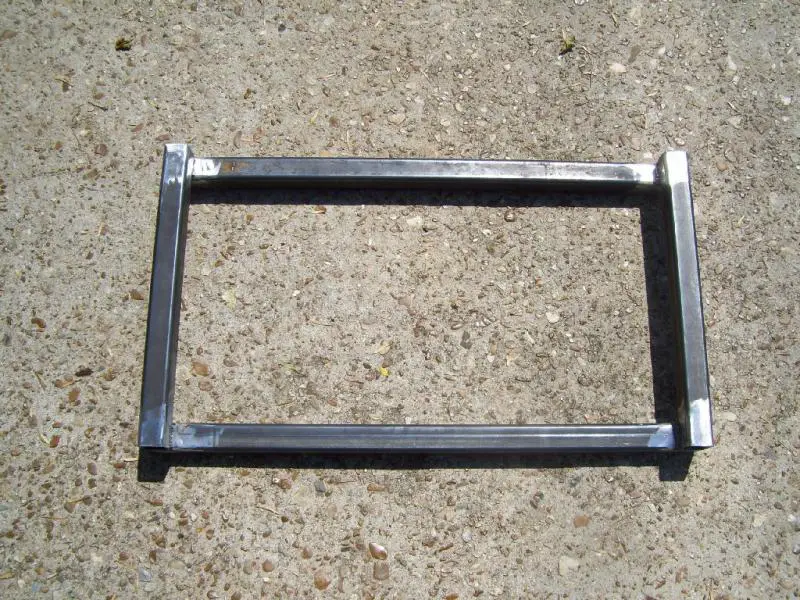
Attach Rails: Securely attach the rails parallel to each other at an appropriate distance apart using welding techniques or heavy-duty bolts.
-
Support Structures: Build support structures at regular intervals along the length of the rails to provide additional stability. These support structures can be constructed using steel pipes or square tubing and should be securely attached to the ground.
-
Leveling: Ensure that the rails and support structures are level by using a spirit level or laser level. This step is crucial for maintaining accuracy during milling operations.
Different Design Options for the Mill’s Foundation
There are various options available. Some common design choices include:
-
Fixed Frame: A fixed frame design involves permanently attaching the mill to a sturdy base, such as concrete or wooden beams. This design provides maximum stability but limits portability.
-
Fences
Crafting a Sled for Your Chainsaw Mill
To ensure smooth and precise cuts when using your home-built portable chainsaw mill, it is essential to have a well-crafted sled. The sled serves as a platform that supports the log and guides the chainsaw along the rails, allowing you to make accurate cuts with ease.
Purpose and Function of the Sled in Chainsaw Milling
The sled plays a crucial role in chainsaw milling by providing stability and control during the cutting process. It acts as a secure base for positioning the log, preventing it from shifting or rolling while you make your cuts. It guides the chainsaw along the rails, ensuring straight and consistent cuts throughout.
Materials and Measurements Needed for Constructing the Sled
When crafting your sled, you will need sturdy materials that can withstand the weight of logs and endure constant use. One commonly used material is plywood due to its affordability and durability. To construct your sled, you will need a piece of plywood cut to fit your desired dimensions. It should be wide enough to accommodate both your log’s width and allow space for maneuvering your chainsaw.
Measurements are crucial when building your sled to ensure optimal functionality. The length of your sled should match or slightly exceed that of your rails to provide ample support for longer logs. The width should be sufficient to hold your log securely without any overhangs that could interfere with cutting.
Consider adding side panels or cleats on either side of the sled to prevent lateral movement of logs during cutting. These can be made from additional pieces of plywood or other suitable materials.
Tips for Ensuring Smooth Movement Along the Rails
To achieve smooth movement along the rails with your chainsaw mill sled, there are a few key tips to keep in mind. First, ensure that the sled is properly aligned with the rails before beginning your cuts. This will help maintain accuracy and prevent any unwanted deviations.
Next, lubricate the sled’s bottom surface with a suitable lubricant or wax to reduce friction between the sled and the rails. This will allow for smoother movement and minimize strain on both the chainsaw and the operator.
Regular maintenance of your sled is also crucial for optimal performance. Inspect it regularly for any signs of wear or damage, such as loose screws or cracks in the plywood. Addressing these issues promptly will help prolong the lifespan of your sled and ensure safe operation.
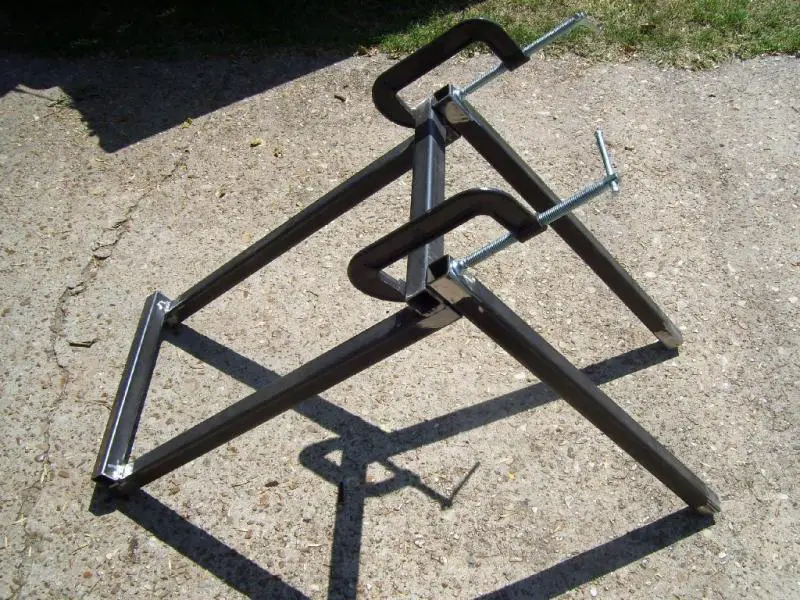
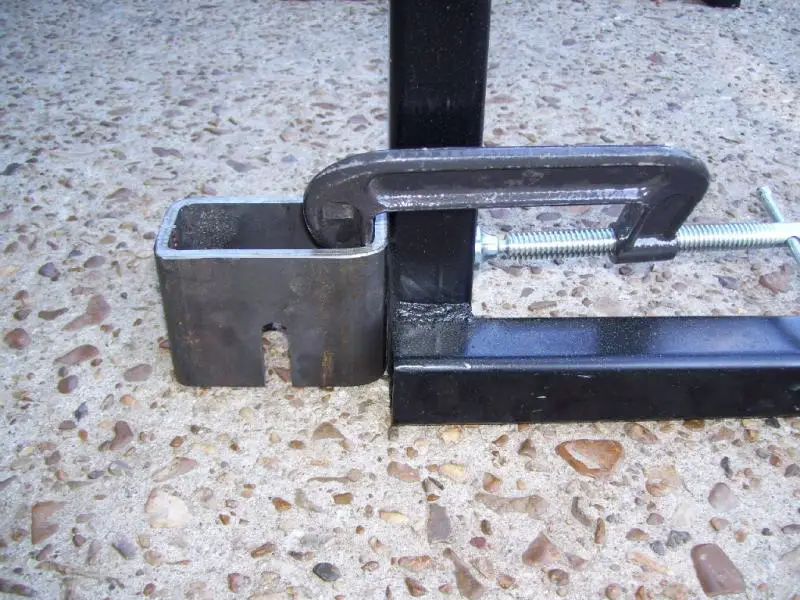
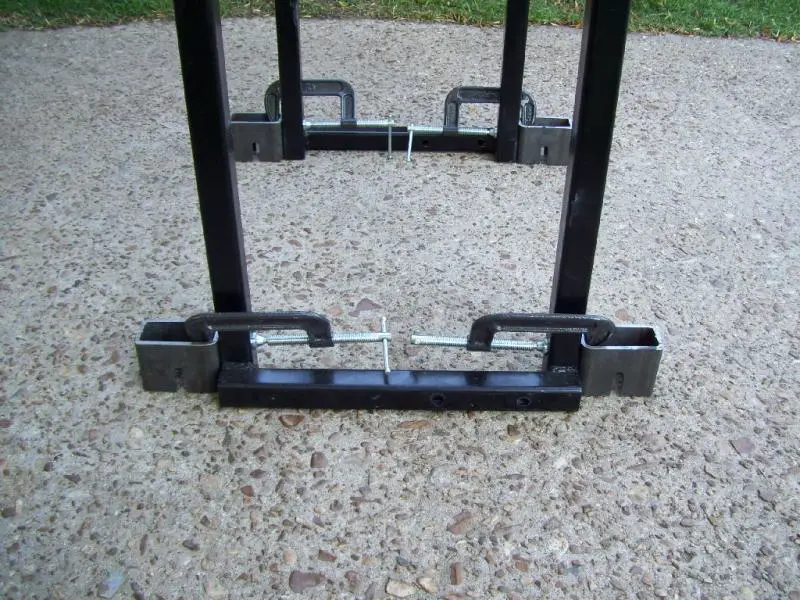
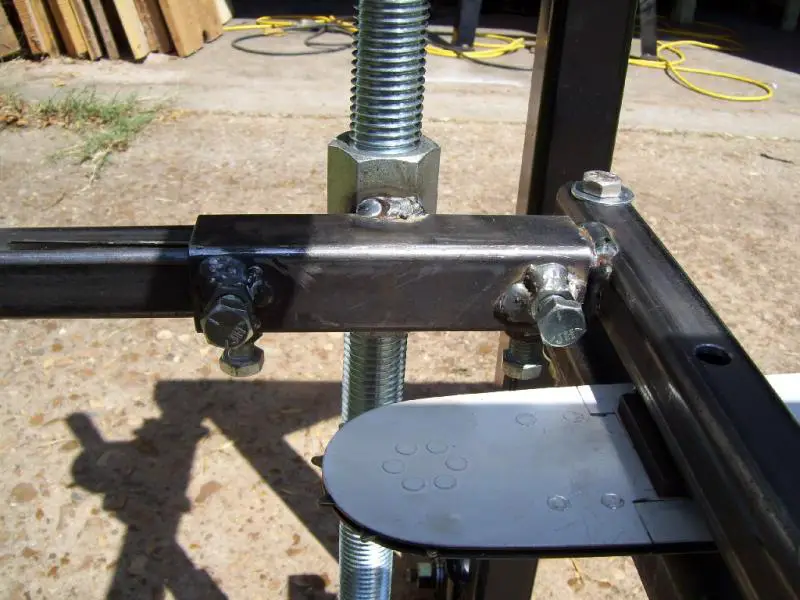
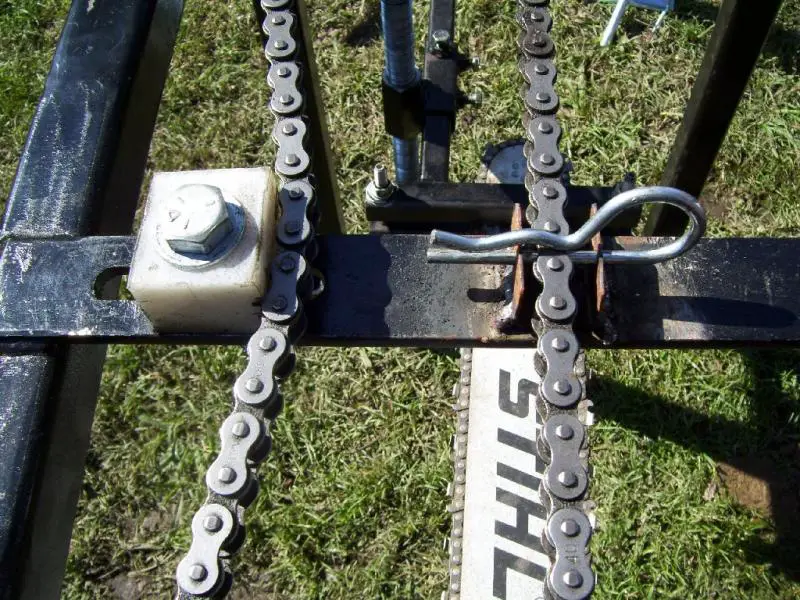
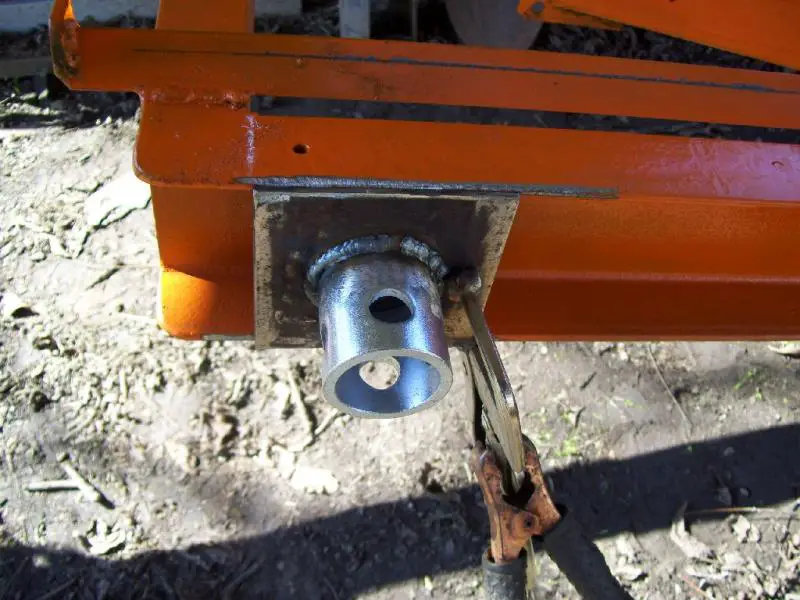
Attaching the Chainsaw Without Welding
Alternative methods for attaching the chainsaw to the mill without welding
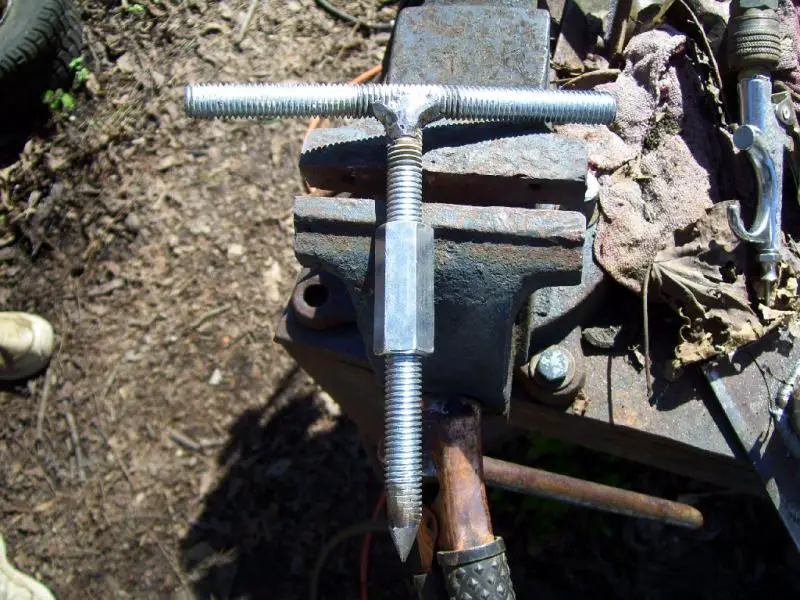
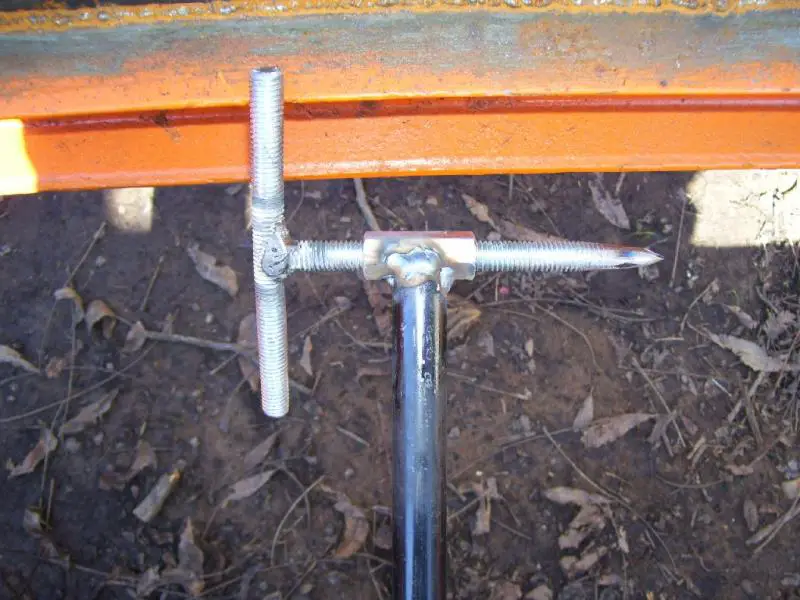
If you don’t have access to a welder or prefer not to use one, there are alternative methods for attaching your chainsaw to the portable mill. One option is using tubing as a connector between the chainsaw and the mill. By selecting a suitable piece of tubing, you can create a secure and stable connection without the need for welding.
Pros and cons of different attachment techniques
There are several techniques you can consider. Each method has its own pros and cons, so it’s important to evaluate them based on your specific needs and preferences.
One popular technique is using clamps or brackets to secure the chainsaw onto the mill. This method offers flexibility as you can easily adjust and remove the chainsaw when needed. However, it’s essential to ensure that the clamps or brackets are sturdy enough to hold the weight of the chainsaw during operation.
Another option is utilizing bolts and nuts with washers to attach the chainsaw. This technique provides a strong connection but may require drilling holes in both the mill and chainsaw bar. It’s crucial to accurately measure and align these holes for proper attachment.
Some manufacturers offer specialized mounting kits designed specifically for attaching chainsaws to portable mills without welding. These kits often include custom brackets or adapters that provide a secure connection while minimizing any potential risks associated with improper attachment.
Safety considerations when securing the chainsaw
Regardless of which attachment technique you choose, safety should always be a top priority when securing your chainsaw onto a portable mill. Here are some key considerations:
-
Stability: Ensure that your chosen method provides a stable connection between the saw and mill. Any wobbling or movement during operation can lead to accidents or damage.
-
Strength: The attachment should be strong enough to withstand the forces generated by the chainsaw’s cutting action. Weak or inadequate connections can pose a safety hazard.
-
Clearance: Make sure there is sufficient clearance between the chainsaw and other components of the mill, such as the guide rails or support structure. This will prevent any interference that could affect the cutting process.
-
Regular inspections: Regularly inspect all attachment points and hardware to identify any signs of wear, damage, or loosening. Tighten bolts and nuts as necessary to maintain a secure connection.
Remember, improper attachment of your chainsaw can lead to accidents, equipment damage, or even personal injury.
Assembling Your Portable Chainsaw Mill
Now that you have successfully attached the chainsaw to the mill, it’s time to assemble all the other components of your home-built portable chainsaw mill. Follow these step-by-step instructions to ensure a smooth assembly process.
Step-by-step instructions for assembling all components of the mill
-
Start by laying out all the parts and hardware in an organized manner. This will help you easily identify and locate each component during assembly.
-
Begin with attaching the guide rail to the milling platform. Use the provided bolts and nuts to secure them tightly together.
-
Next, attach the adjustable log brackets to both ends of the guide rail. These brackets will hold the logs in place while you saw through them.
-
Install the chain tensioner on one end of the guide rail, ensuring that it is properly aligned with the chainsaw bar.
-
Connect the drive sprocket to one end of the guide rail, making sure it is securely fastened.
-
Attach any additional accessories or features that came with your portable chainsaw mill, such as a log clamp or depth gauge.
Proper alignment and adjustment techniques during assembly
During assembly, it is crucial to pay attention to proper alignment and adjustment techniques to ensure optimal performance from your portable chainsaw mill.
-
Check that all components are aligned correctly before tightening any bolts or nuts. Misalignment can lead to uneven cuts and potential damage to your equipment.
-
Use a level tool to ensure that both ends of the guide rail are at an equal height and parallel to each other. This will help maintain consistent cutting accuracy throughout your milling process.
-
Adjust the chain tension according to manufacturer guidelines for your specific chainsaw model. A properly tensioned chain ensures smooth operation and reduces strain on both your chainsaw and milling system.
Troubleshooting common issues during the assembly process
While assembling your home-built portable chainsaw mill, you may encounter some common issues. Here are a few troubleshooting tips to help you overcome these challenges:
-
If you’re having difficulty aligning the guide rail and milling platform, double-check that all components are properly seated and tightened. Loosen any bolts or nuts that may be causing misalignment and readjust as necessary.
-
In case of excessive chain slack or tension, refer to your chainsaw’s manual for instructions on adjusting the chain tensioner. Incorrect chain tension can affect cutting performance and safety.
-
If the log brackets are not securely holding the logs in place, ensure that they are tightened properly against the guide rail. Consider adding additional support if needed.
Preparing Logs and Anchoring Techniques
Techniques for Preparing Logs Before Milling
Before you start milling with your home-built portable chainsaw mill, it’s important to properly prepare the logs. This preparation ensures smoother and more efficient milling. One essential step is debarking the logs. By removing the bark, you eliminate potential obstacles that could interfere with the cutting process. It also helps prevent debris from getting into your saw, which can cause damage or affect its performance.
Another technique to consider is leveling the logs. Uneven surfaces can make it challenging to achieve precise cuts and may lead to instability during the milling process. To level a log, you can use wedges or shims to create a stable base on which it rests. This will help ensure consistent results when cutting your lumber.
Different Anchoring Methods for Log Stability
Securing the logs in place is crucial to maintain stability while milling. One common method is using log bunks, which are supports placed under the log at regular intervals along its length. These bunks provide stability and prevent any movement or shifting during the milling process.
Another anchoring technique involves using clamps or chains to secure the log firmly onto a sturdy surface such as a workbench or sawhorse. This method provides additional stability and minimizes any potential movement while you’re operating your chainsaw mill.
Tips for Maximizing Log Stability and Safety
To maximize log stability during milling, it’s important to consider a few key tips:
-
Start by selecting logs that are straight and free from major defects such as rot or large knots. This will help ensure stability throughout the milling process.
-
Always position yourself in a safe location while operating your chainsaw mill, away from any potential hazards.
-
Use appropriate safety gear such as gloves, eye protection, and hearing protection to protect yourself during operation.
-
Take breaks periodically to check on log stability and adjust any anchoring methods if necessary.
-
Be mindful of the weight distribution on your mill and make adjustments as needed to maintain balance.
By following these tips, you can enhance both log stability and safety while using your home-built portable chainsaw mill.
Operational Tips for Efficient Chainsaw Milling
There are several operational tips that can help you achieve optimal cutting speed and accuracy, maintain proper chain tension and sharpness, and minimize waste while maximizing lumber yield. Let’s dive into these best practices in more detail.
Best Practices for Optimizing Cutting Speed and Accuracy
To ensure efficient chainsaw milling, it is essential to follow some best practices that can help you optimize cutting speed and accuracy. First and foremost, make sure to choose the right chainsaw for the job. A powerful chainsaw with a long bar length will enable you to cut through logs more quickly and effectively.
Proper alignment of the chainsaw mill is crucial. Ensure that the mill is securely attached to the log and positioned correctly before starting each cut. This will help maintain stability throughout the milling process, resulting in straighter cuts with minimal deviation.
Another tip is to establish a consistent feed rate while operating the chainsaw mill. By maintaining a steady pace as you push the saw through the log, you can achieve smoother cuts without putting excessive strain on your equipment or compromising accuracy.
Maintaining Proper Chain Tension and Sharpness for Smooth Cuts
Maintaining proper chain tension and sharpness is vital for achieving smooth cuts with your home-built portable chainsaw mill. Regularly check the tension of your saw’s chain before each milling session. A loose chain can lead to imprecise cuts and increase the risk of kickback, while an overly tight chain may cause unnecessary strain on your equipment.
Keep your chainsaw’s chain sharp at all times by regularly filing or sharpening it. Dull blades not only slow down cutting speed but also increase the chances of kickback or other accidents due to reduced control over the saw.
Strategies for Minimizing Waste and Maximizing Lumber Yield
Efficient chainsaw milling involves minimizing waste and maximizing lumber yield from each log. One effective strategy is to carefully plan your cuts before starting the milling process. By strategically positioning your cuts, you can minimize the amount of unnecessary material removed, thus reducing waste.
Furthermore, consider the dimensions of the lumber you intend to produce. By accurately measuring and marking the desired dimensions on the log, you can ensure that each cut aligns with your intended outcome, optimizing lumber yield.
Another tip is to use a guide or template for consistent sizing. This can help ensure uniformity in the thickness and width of your lumber pieces, making them easier to work with during subsequent woodworking projects.
Maintenance, Troubleshooting, and Enhancements
Regular maintenance is essential to keep your home-built portable chainsaw mill in good working condition. By performing routine tasks, you can ensure that your mill operates smoothly and efficiently. One of the most important maintenance tasks is regularly lubricating the chainsaw bar and chain. This helps to reduce friction and prevent premature wear. It’s crucial to check the tension of the chain regularly and adjust it as needed to ensure proper cutting performance.
Another maintenance task is keeping the mill clean. After each use, make sure to remove any sawdust or debris that may have accumulated on the mill’s components. This will help prevent clogs and maintain optimal performance. It’s also a good idea to inspect all bolts and connections periodically to ensure they are tight and secure.
There are a few common problems that you may encounter. One issue could be uneven cuts or wavy lumber. This can be caused by an improperly aligned chainsaw bar or a dull chain. To fix this problem, check the alignment of the bar and sharpen or replace the chain if necessary.
Another common issue is difficulty in starting the chainsaw engine or poor engine performance. This could be due to a clogged air filter or spark plug problems. Cleaning or replacing the air filter and checking/replacing the spark plug can often resolve these issues.
If you’re looking for ways to enhance your home-built portable chainsaw mill’s performance, there are several upgrades you can consider. Adding a guide rail system can help improve stability and accuracy while cutting. A water cooling system can also be beneficial for reducing heat buildup during extended milling sessions.
Upgrading to a higher-quality chainsaw bar and chain can result in smoother cuts and increased durability. Some mills may also benefit from adding a power feed mechanism, which automates the feeding process for more efficient milling.
Conclusion
Congratulations! You’ve reached the end of this guide on building a home-built portable chainsaw mill. Throughout this article, we’ve explored the benefits of using a home-built portable chainsaw mill, discussed the essential tools and materials needed for construction, and covered each step of the building process.
By now, you should have a solid understanding of how to construct your own chainsaw mill and begin milling logs with efficiency and precision. Remember to prioritize safety at all times and follow the operational tips provided to ensure smooth operation.
Now it’s time to put your newfound knowledge into action. Gather your tools, gather your materials, and start building your very own home-built portable chainsaw mill. With this versatile tool by your side, you’ll be able to turn logs into lumber with ease. Happy milling!
Frequently Asked Questions
Can I build a portable chainsaw mill myself?
Absolutely! Building a home-built portable chainsaw mill is a rewarding project that allows you to customize it according to your needs. With the right tools and materials, you can construct your own mill and start milling logs in no time.
What are the benefits of using a home-built portable chainsaw mill?
Using a home-built portable chainsaw mill offers several advantages. It allows you to save money by utilizing your existing chainsaw instead of purchasing an expensive dedicated sawmill. It provides flexibility in terms of location and portability, enabling you to take the mill wherever the logs are.
What tools and materials do I need for building a chainsaw mill?
To build a home-built portable chainsaw mill, you will need essential tools such as a drill, circular saw, wrenches, clamps, measuring tape, and safety equipment. The necessary materials include steel rails, lumber for the foundation and sled, bolts, nuts, washers, and plywood for constructing various components.
How do I attach the chainsaw without welding?
If you don’t have access to welding equipment or prefer not to weld, there are alternative methods for attaching the chainsaw to your portable chainsaw mill. One option is using metal brackets and bolts to secure the saw onto the sled or carriage assembly. This provides stability while allowing easy removal when needed.
What are some operational tips for efficient chainsaw milling?
To ensure efficient chainsaw milling with your home-built portable chainsaw mill: maintain sharp saw blades; apply consistent pressure while cutting; make precise measurements before each cut; secure logs properly; use guide rails or guides for accurate cuts; and always prioritize safety by wearing appropriate protective gear.